AF_reload's Posts
How to create a Ln account connected to your node using Bluewallet and Tailscale.
Posted 8 months ago
I created this tutorial for my children, they like bluewallet, it is simple for them, I know that there are Zeus and other apps with better functions that use Tor.
Since Bluewallet stopped using Tor, this is a good option to use our sats at any time.
Pre requirements
-bluewallet
-tailscale
-static address for the node
-bluewallet
-tailscale
-static address for the node
Procedure.
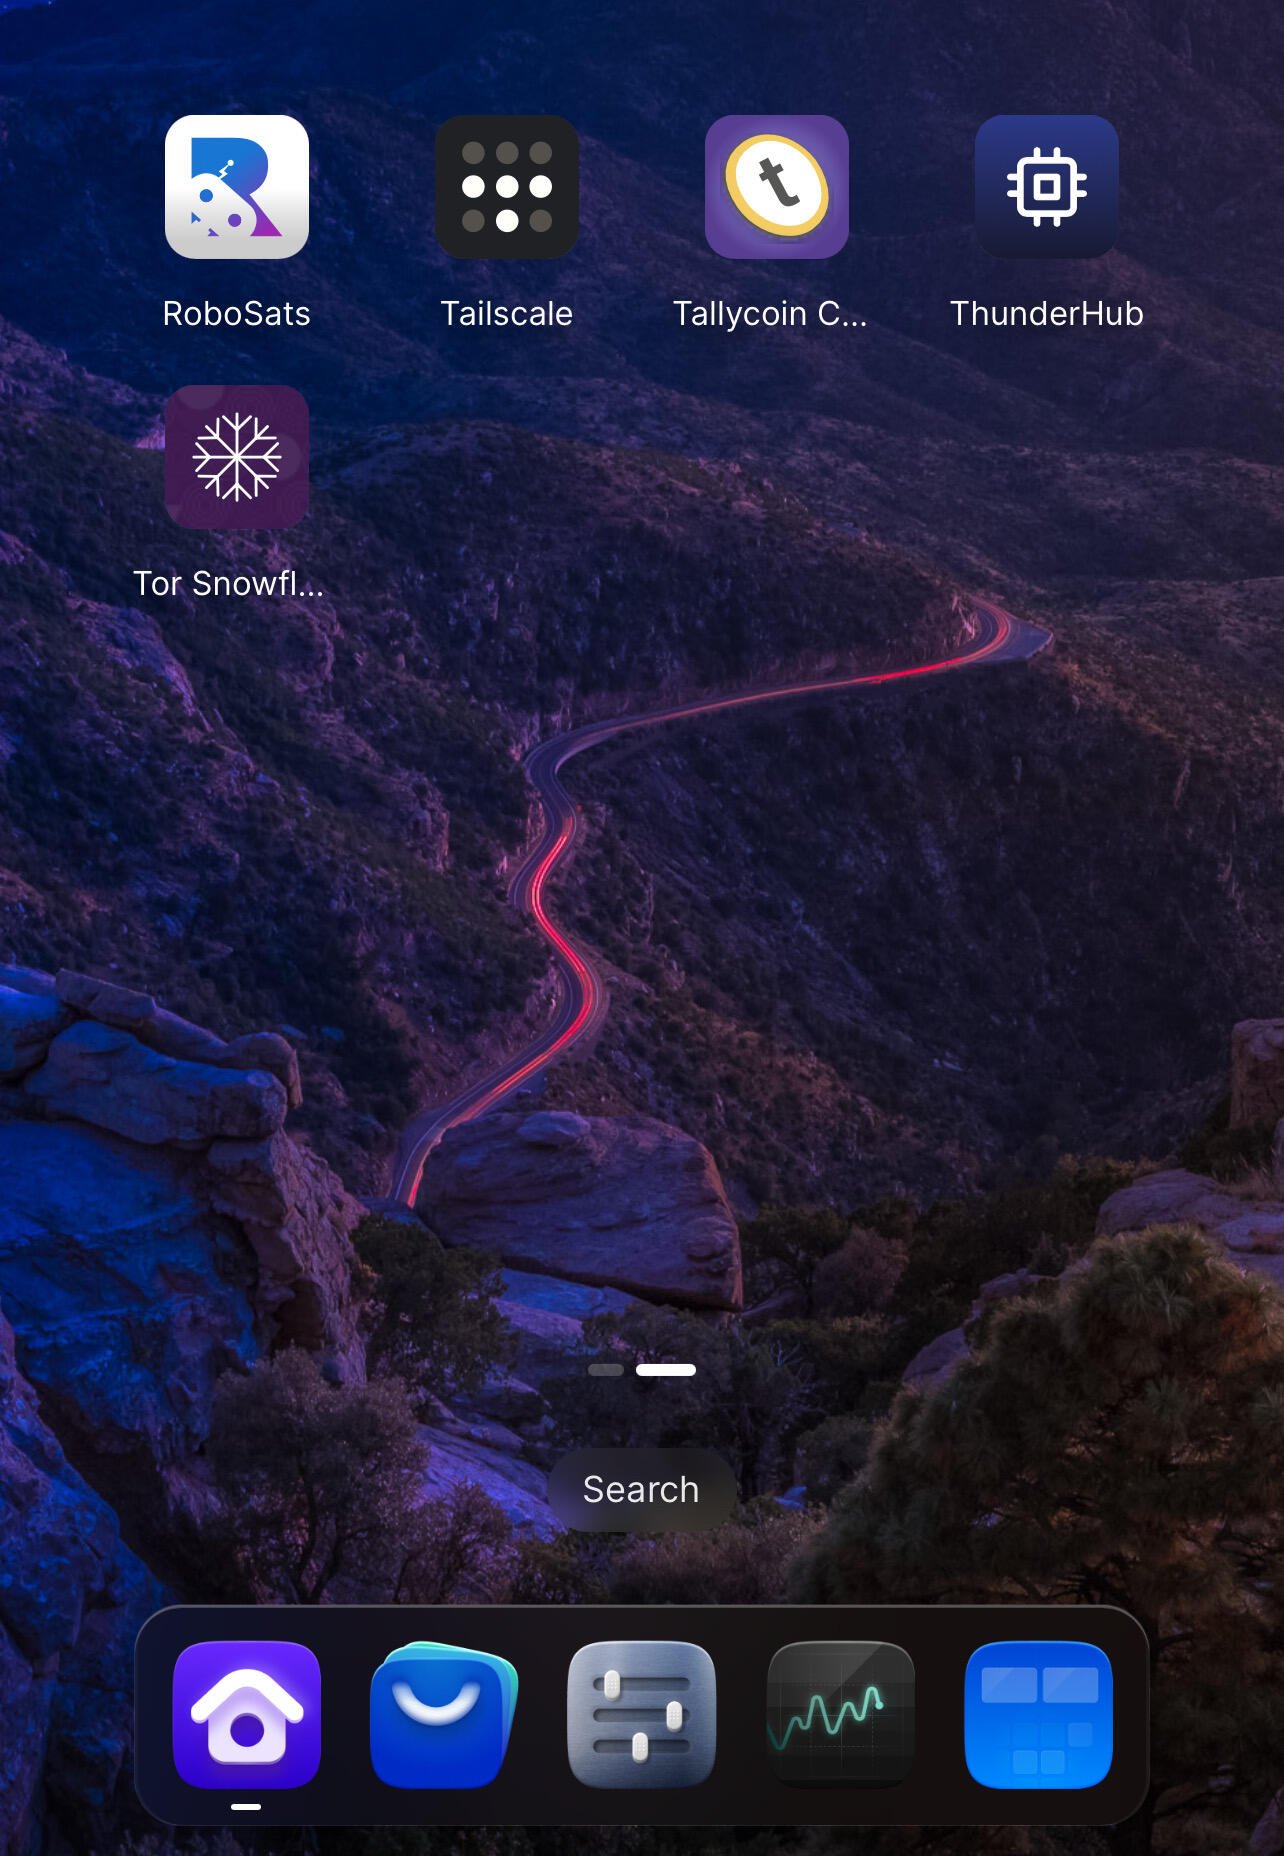
- Install the Bluewallet app on your node and your smart device.
2. Install Tailscale on your node, it will ask you to create an account using email. Install the application on your smart device and use the same email that you used on your node.
https://image.nostr.build/4952aac246d9ae0db7ca9103084b892ea3b9fbbbcf79463531f8c0311b23c72b.jpg
https://image.nostr.build/4952aac246d9ae0db7ca9103084b892ea3b9fbbbcf79463531f8c0311b23c72b.jpg
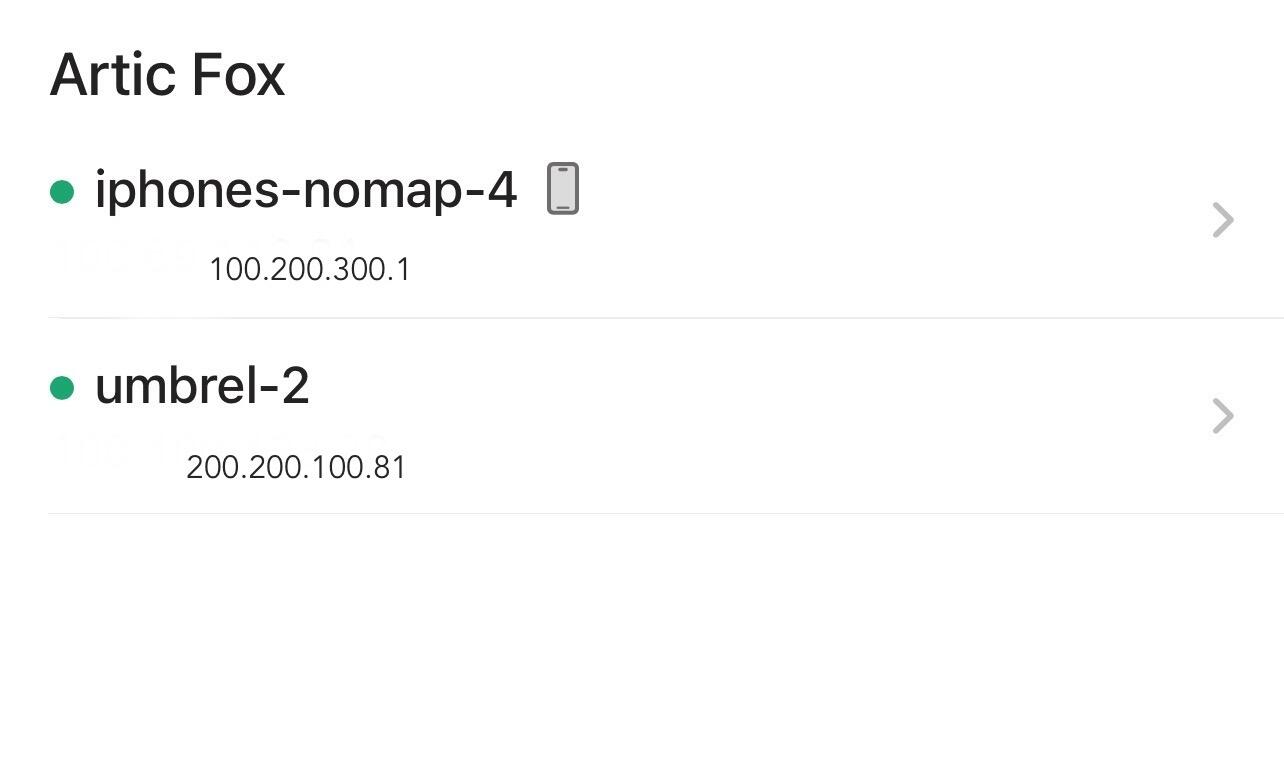
3. On your smart device open the Tailscale application and log in, you will see two devices connected with their own IP (your node and your cell phone, in my case), press the name of your node and your addresses will appear, IPV4, magicdns, IPV6, in addition to the expiration of your access key.
https://image.nostr.build/2067862c814619327ff5f3a43682d8a642cf5123a89b7763b8e96f7fb83fc2d6.jpg
https://image.nostr.build/2067862c814619327ff5f3a43682d8a642cf5123a89b7763b8e96f7fb83fc2d6.jpg
Test
We are going to copy and paste the IPV4 address into your browser, the log in of your node should appear, in my case it is umbrel. With this we know that there is a connection with our node.
We are going to copy and paste the IPV4 address into your browser, the log in of your node should appear, in my case it is umbrel. With this we know that there is a connection with our node.
Connect tailscale to bluewallet
-On our device we open the Bluewallet application and select the 3 dots “…” in the upper right corner (settings) > Network> Lightning settings > paste the IPV4 address and add at the end: 3008 is the port that Bluewallet uses on our node. You can also use magicdns and add the port :3008 at the end. e.g.
http://200.200.100.81:3008
Create accounts
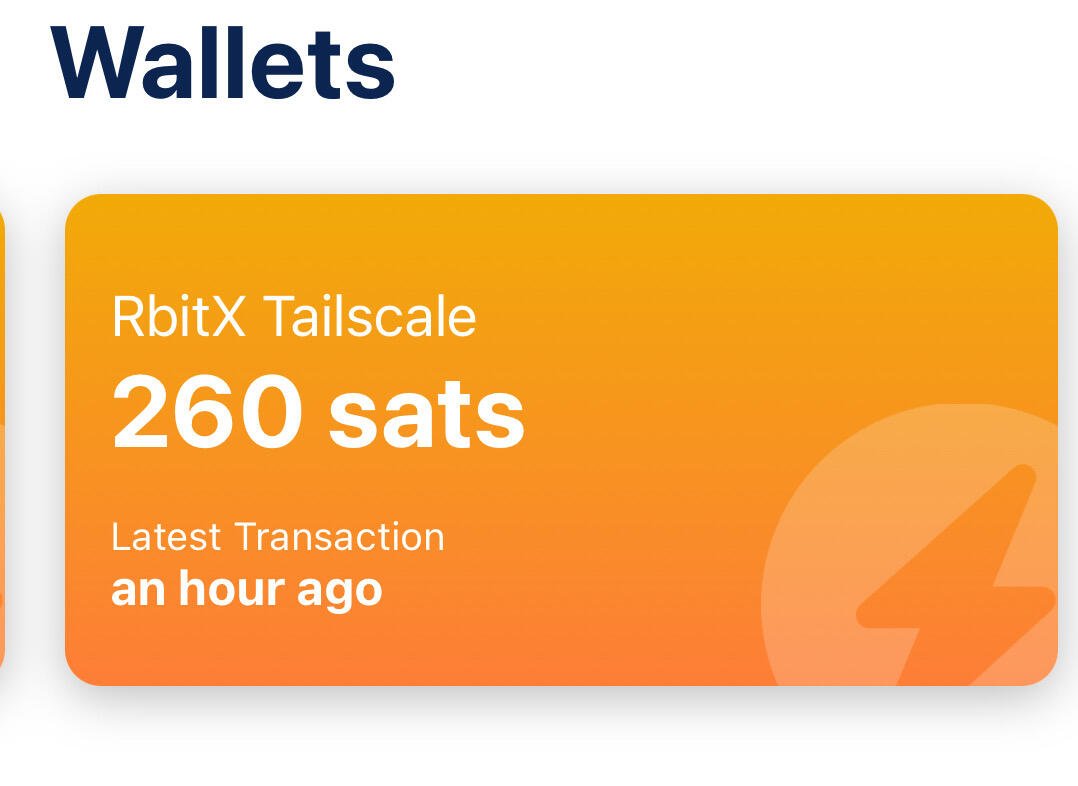
We can now create accounts connected to our node using tailscale. In bluewallet >press the “+” sign> lightning>create A QR image will appear with an address at the bottom, we will use it later to create the same account but with a local network.
E.g.
lndhub://user:password@http://host:port
lndhub://numbers and letters:number and letters@http://IPV4:3008
https://image.nostr.build/a2f2231a49cb34532686cc4f024f0d0555e6482aa36db6bba27d06d5bd030cc9.jpg
Create the same account but on a local network
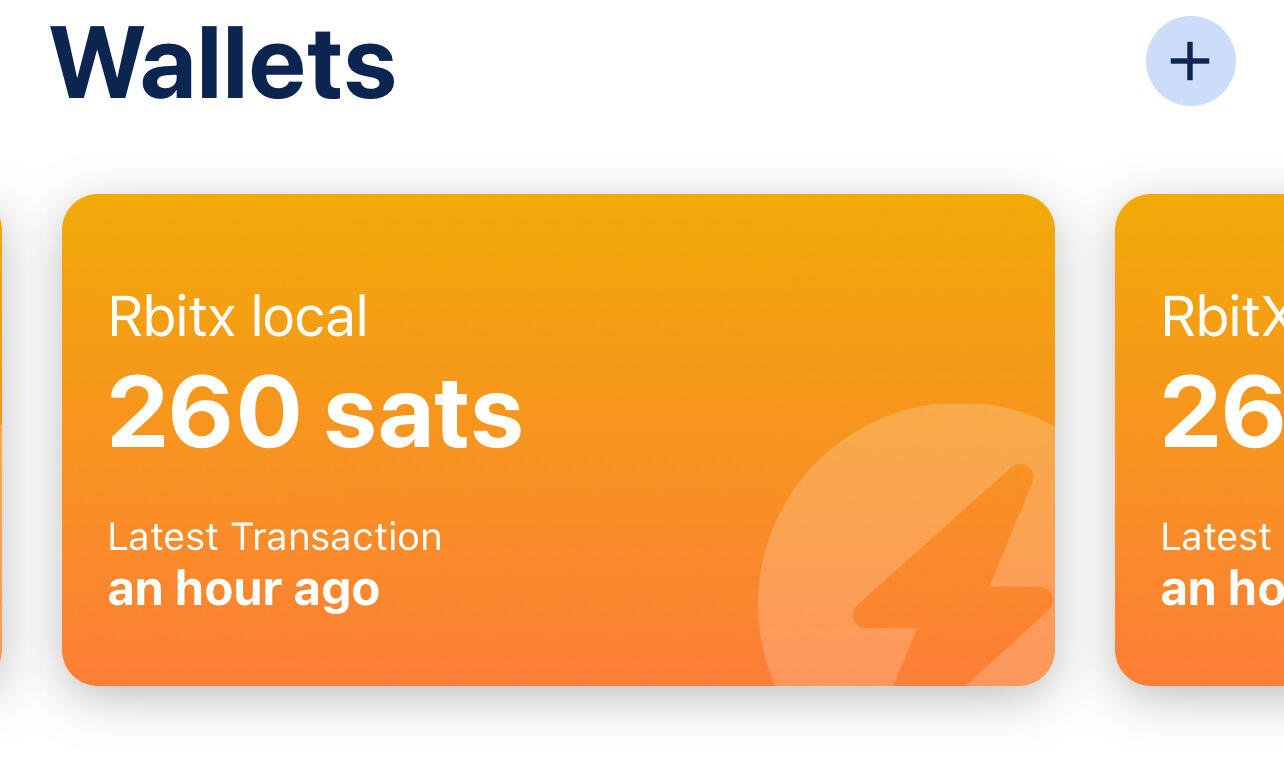
Once the account with tailscale connection is created, we can recreate the same account. In our new Lightning account we press “…”> export/backup> copy the account We import the existing account but we will change the host to the local umbrel host, for that we go to the “+” sign in bluewallet > lightning > import Wallet > we paste the backup of the tailscale account and modify the end with our local umbrel ip .
E.g.
lndhub://user:password@http://host:port
lndhub://numbers and letters:number and letters@http://umbrel.local:3008
lndhub://numbers and letters:number and letters@http://10.90.87.191:3008
https://image.nostr.build/15ac1a4ba69a337a8f1f1fa585b92c4a84fa823dc252d6657294c58dc4f22e8a.jpg
You already have the same account on the local network and with tailscale.
Important considerations
-Accounts with IPv4 only work and are updated when tailscale is activated.
-Tailscale keys expire, so it is good to create the same account on the local network and then modify it with the new IPv4 that is generated after the previous one expires.
-The account may cease to exist and with it your sats if the node ceases to exist, an account for personal use is recommended.
-Accounts are updated when Tailscale is online, so it may take a few seconds to load.
remember not your keys not your coins
Liked the article? Send Zaps
Liked the article? Send Zaps
Articfox@getalby.com
Cove Wallet + Tailscale (connect to your own node)
Posted 12 months ago
Since Cove Wallet doesn't use Tor (at the time of writing), this is a good option for using our sats anytime while maintaining privacy.
Procedure.
1 install the Cove Wallet app on your smart device.
2 install Tailscale on your node, it will ask you to create an account using email. Install the application on your smart device and use the same email that you used on your node.
https://image.nostr.build/4952aac246d9ae0db7ca9103084b892ea3b9fbbbcf79463531f8c0311b23c72b.jpg
3 on your smart device open the Tailscale application and log in, you will see two devices connected with their own IP (your node and your cell phone, in my case), press the name of your node and your addresses will appear, IPV4, magicdns, IPV6, in addition to the expiration of your access key. https://image.nostr.build/2067862c814619327ff5f3a43682d8a642cf5123a89b7763b8e96f7fb83fc2d6.jpg
Test
We are going to copy and paste the IPV4 address into your browser, the log in of your node should appear, in my case it is umbrel.
With this we know that there is a connection with our node.
We are going to copy and paste the IPV4 address into your browser, the log in of your node should appear, in my case it is umbrel.
With this we know that there is a connection with our node.
Connect tailscale to Cove Wallet
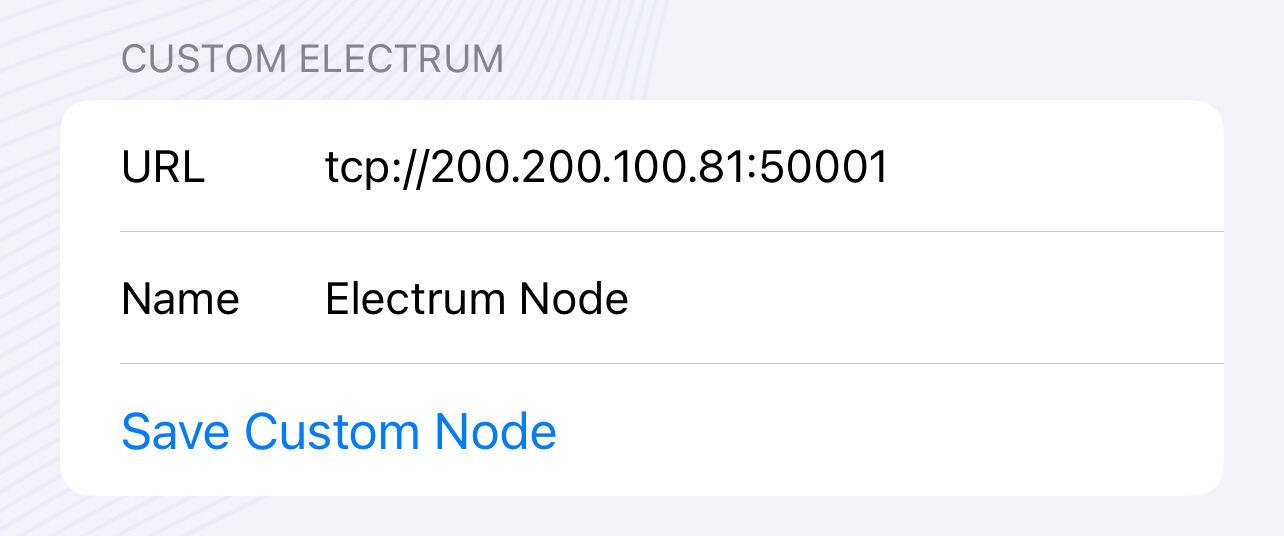
- On our device, open the Cove Wallet app and select the three lines in the top left corner. Then, select Settings > Node > Electrum Custom. Paste the IPv4 address and add 50001 to the end, this is the port used by Electrum on our node. You can also use magicdns and add port 50001 to the end. For example: http://200.200.100.81:50001
If everything is ok you should read a connection notification.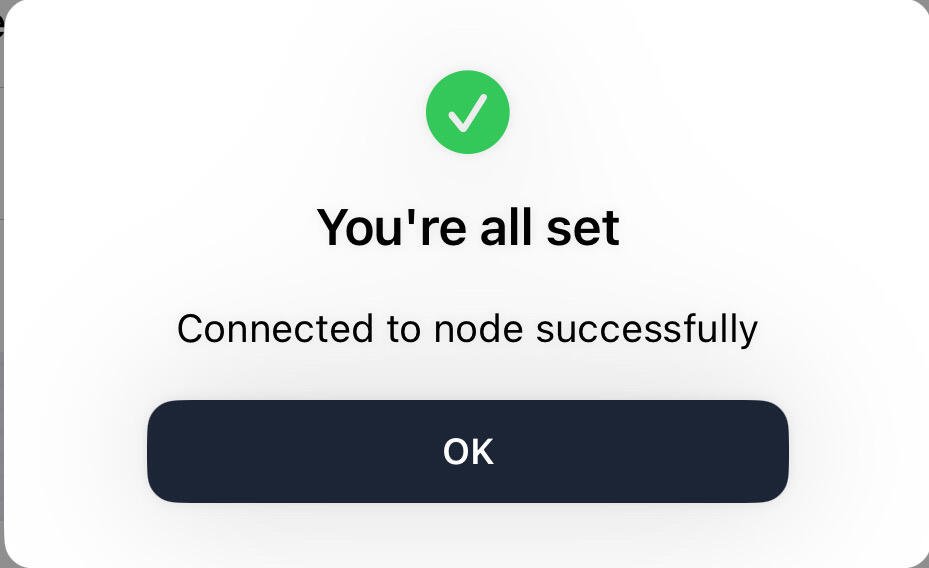
Important considerations
-Wallets are updated and only work with IPv4 when tailscale is enabled.
-Tailscale keys expire, pay attention to updates and repeat the process.
-Wallets are updated and only work with IPv4 when tailscale is enabled.
-Tailscale keys expire, pay attention to updates and repeat the process.
remember not your keys not your coins
Liked the article? Send Zaps
Liked the article? Send Zaps
Articfox@getalby.com

Umbrel + Albyhub + Alby Go Accounts
Posted over 1 year ago
In this tutorial we explain how to connect Alby go to your node through Albyhub, with this we can have our sats custodian and use our getalby address to receive sats without generating an invoice.
Prerequisites Have a node, in my case it is an umbrel node. Have open channels,liquidity
Steps.
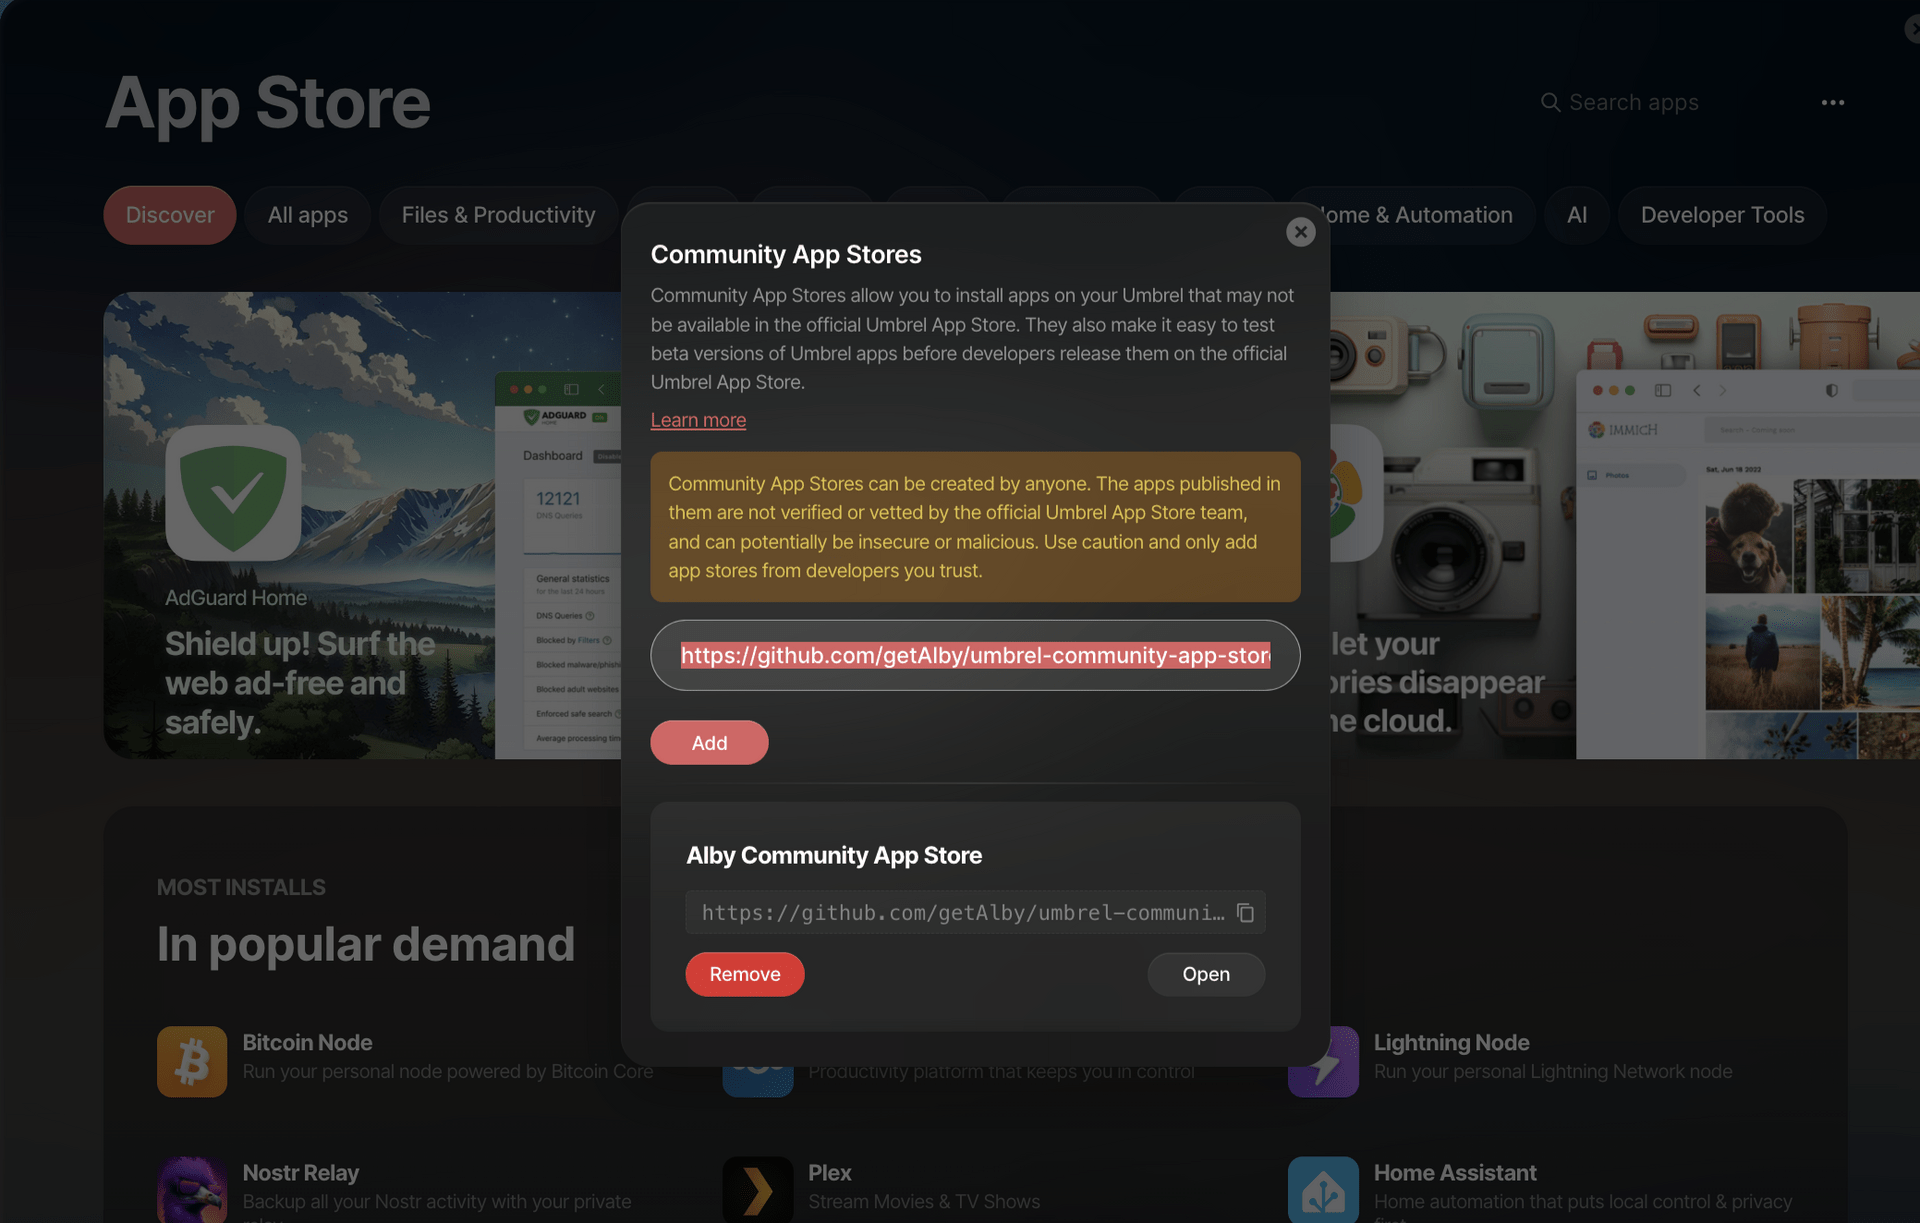
- In our node we go to applications and add alby hub from community apps. (See image) https://github.com/getAlby/umbrel-community-app-store.git https://image.nostr.build/a96aba0f9cf3f8536af4f062318ad634635592f3b606d2ae6fb24b71a51997a3.png
- We install the alby hub application.
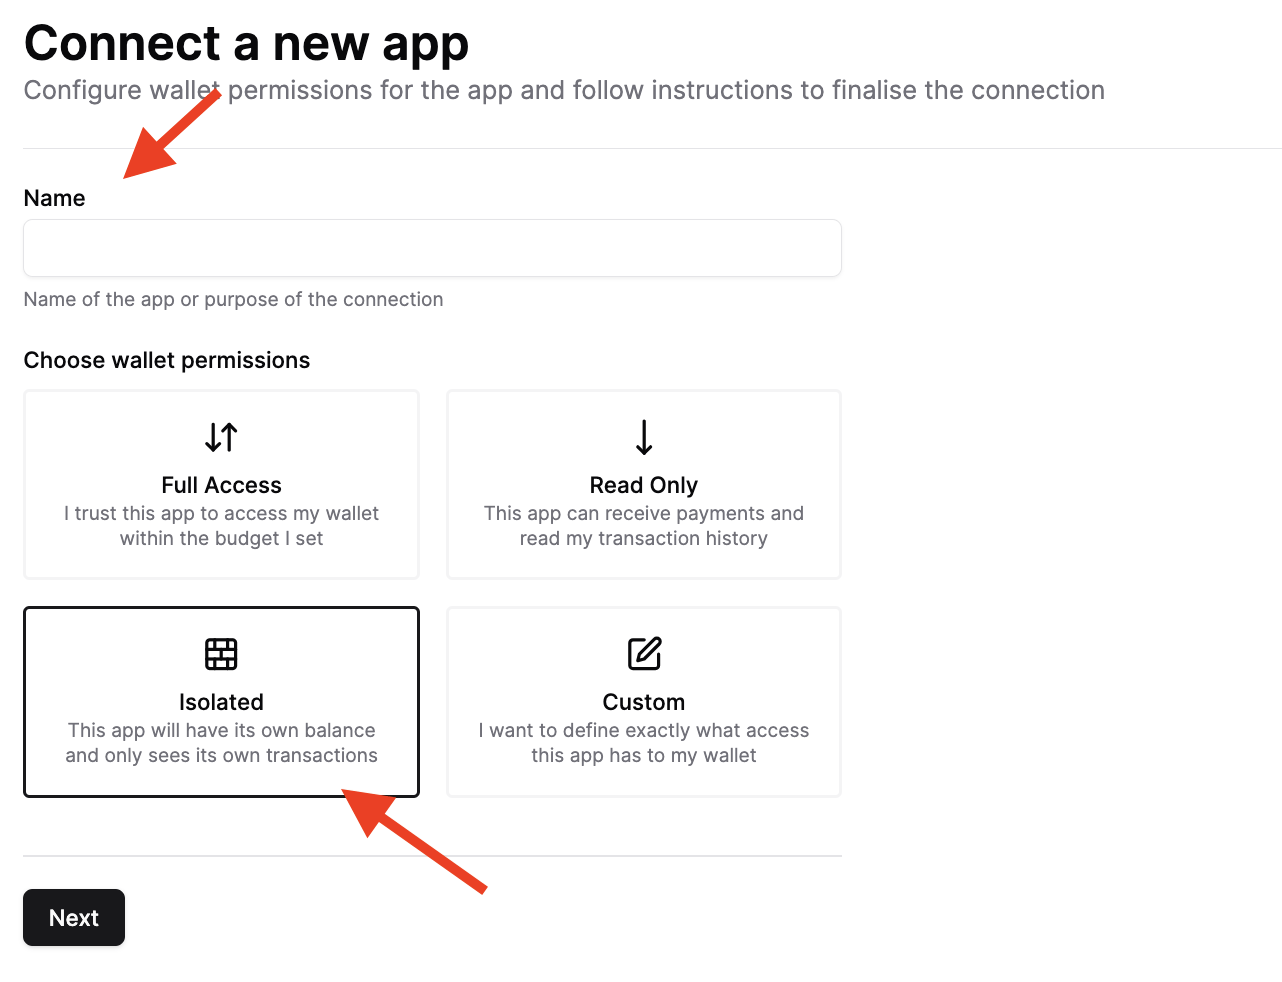
- We enter alby hub In the connections section > add connection > isolated (we will use isolated to create new accounts with their own balance) > we enter the name of the account in my case it will be my alby account, articfox@getalby.com (it is just In order to distinguish them, I will do this procedure for the accounts of family and friends)> an unrevealed QR code will appear, for now we move on to step 4.

- We download the alby go cell phone app (https://apps.apple.com/us/app/alby-go/id6471335774)
- In Alby go > connect wallet > name the wallet (i name it articfox@getalby.com)> read the QR code from step 3
In order to use our getalby address you must connect nostr wallet to our account using web page
- In AlbyGo we go to settings (In the upper right corner)> and copy export wallet, it will help us connect with our getlaby address.
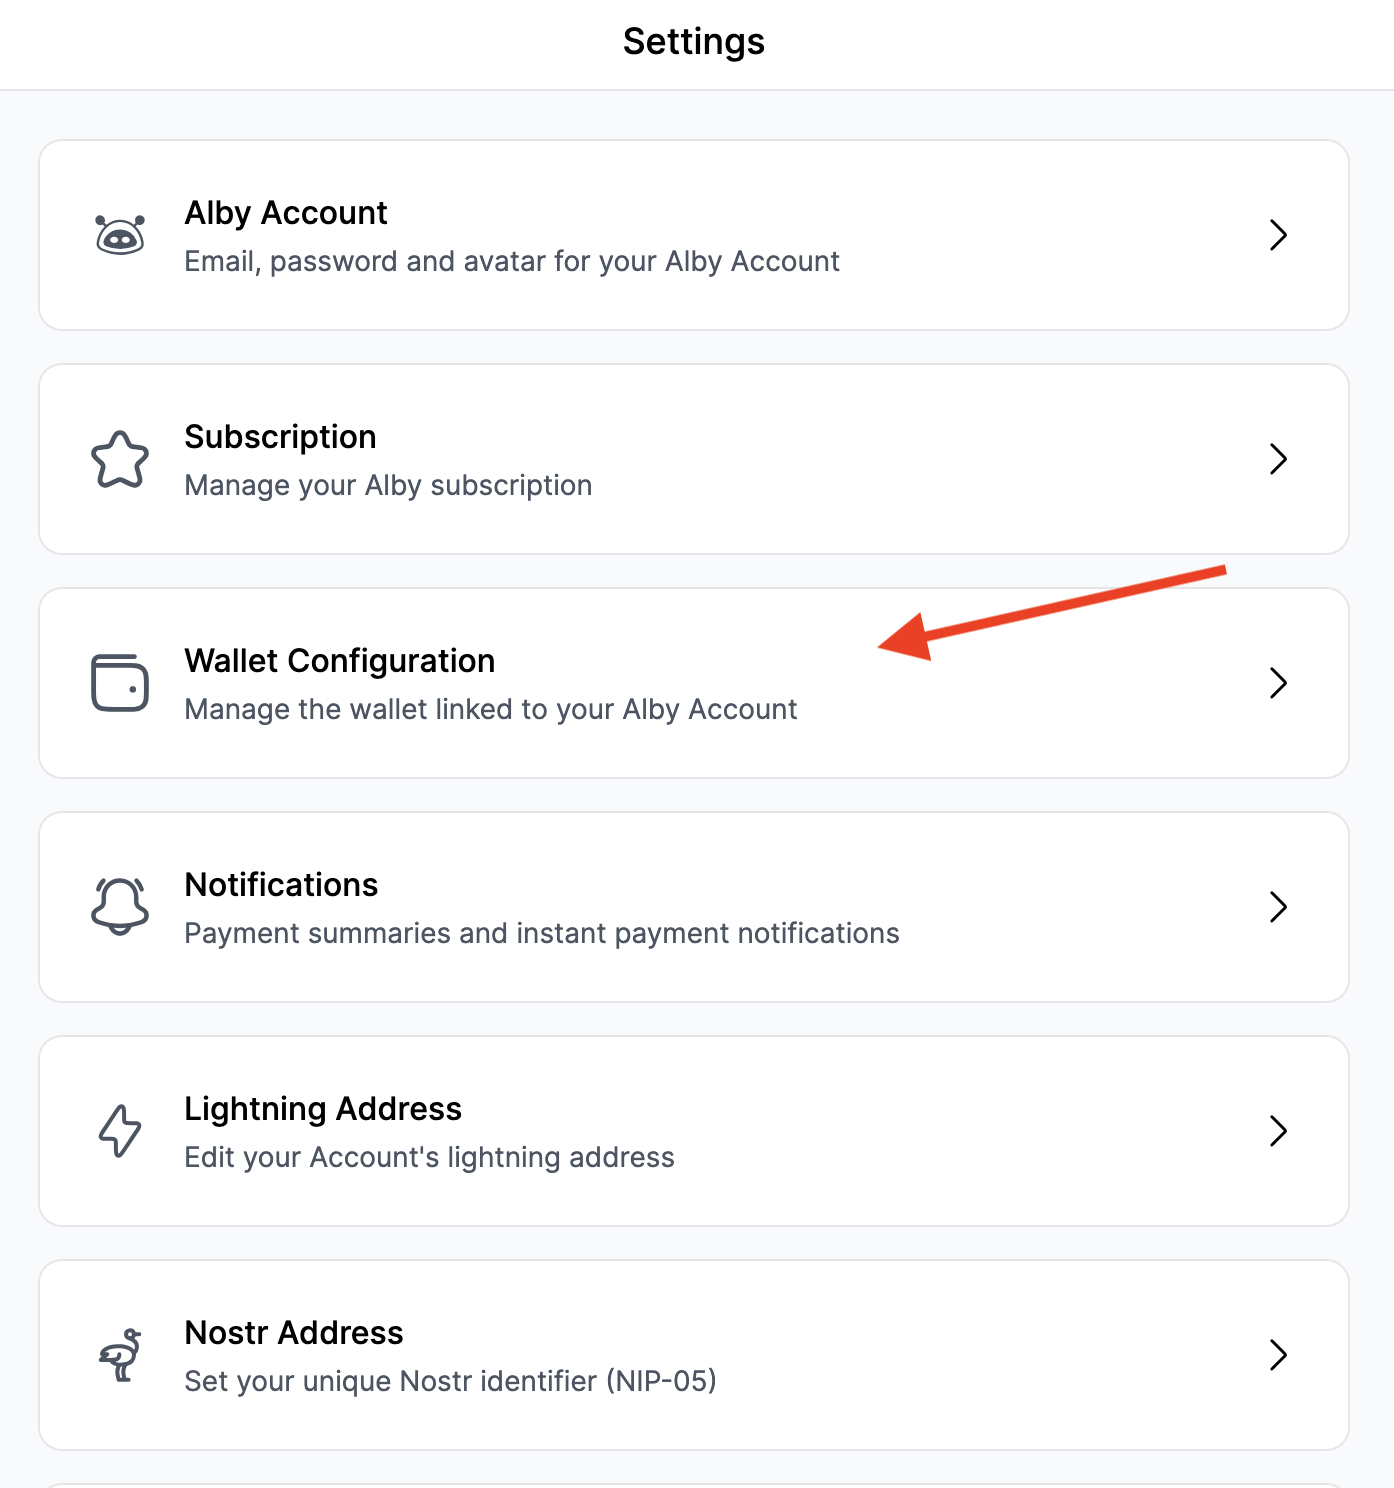
- In our browser we enter https://getalby.com/ > setting > wallet configuration >link to your own wallet >nostr wallet connect your and we copy the information from step 6. https://image.nostr.build/579fe1fa9c1a4eabd09fd7aba496f9d3e529c99ecbe075f8ab5071b53ee026b0.png
- Remember to add your alby address in setting in the alby go application.
With this we have our node as custodian of the sats, we create an account with a 0 balance to start receiving sats (and be able to make more accounts for friends and family), we connect our getalby address with our wallet to be able to receive sats without generating invoices.
Recommendations
- The person who controls the node must have liquidity at all times.
- The node must be connected 24 hours a day.
- If the node disappears, the sats of the linked accounts also disappear.
- In Alby go save the export Wallet secret.
remember not your keys, not your coins.
Articfox@getalby.com

Compound Annual Growth Rate (CAGR) Bitcoin
Posted over 1 year ago
The Compound Annual Growth Rate (CAGR) is a measure that describes the growth of an investment over a period of time, assuming that profits are reinvested at the end of each period. It is expressed as a percentage and provides a constant growth rate that, if applied each year, would result in the final value of the investment.
The formula to calculate the CAGR is: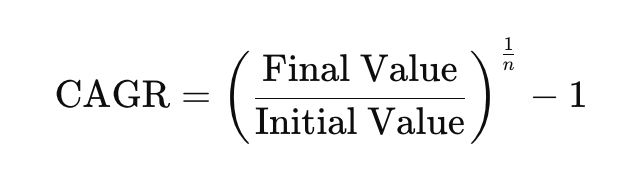
Where:
- Final value: the value of the investment at the end of the period.
- Initial value: the value of the investment at the beginning of the period.
- n: the number of years in which the investment has been made.
The CAGR is useful because it allows you to compare the growth of different investments or assets over time, eliminating the volatility that can occur in shorter periods.
If we see the image, we could buy Bitcoin every September and we would have returns greater than standard and poors (market), returns greater than inflation (USD terms).
You could have interesting returns if we use dollar cost average.
remember not your keys, not your coins.
Articfox@getalby.com
Articfox@getalby.com

Walkthrough NFC Sticker + Watch-Only (Zpub) Bitcoin
Posted over 1 year ago
In the context of Bitcoin, "watch-only" wallets (view-only wallets) are wallets configured to view balances and transactions without having access to private keys. These wallets are useful for monitoring activity at an address without risking compromising funds, as they do not allow signing transactions. After protecting the private key (12 or 24 words) in metal sheets or washers and we want to add funds without entering the private key all the time, using an NFC sticker with the zpub can be very convenient, this is a tutorial on how to achieve that .
Prerequisites:
Have a Bitcoin wallet and know how to get the zpub.
Download the bluewallet app on your device, it is the app that we will use to open and obtain the information read from the NFC sticker.
Android
IOS
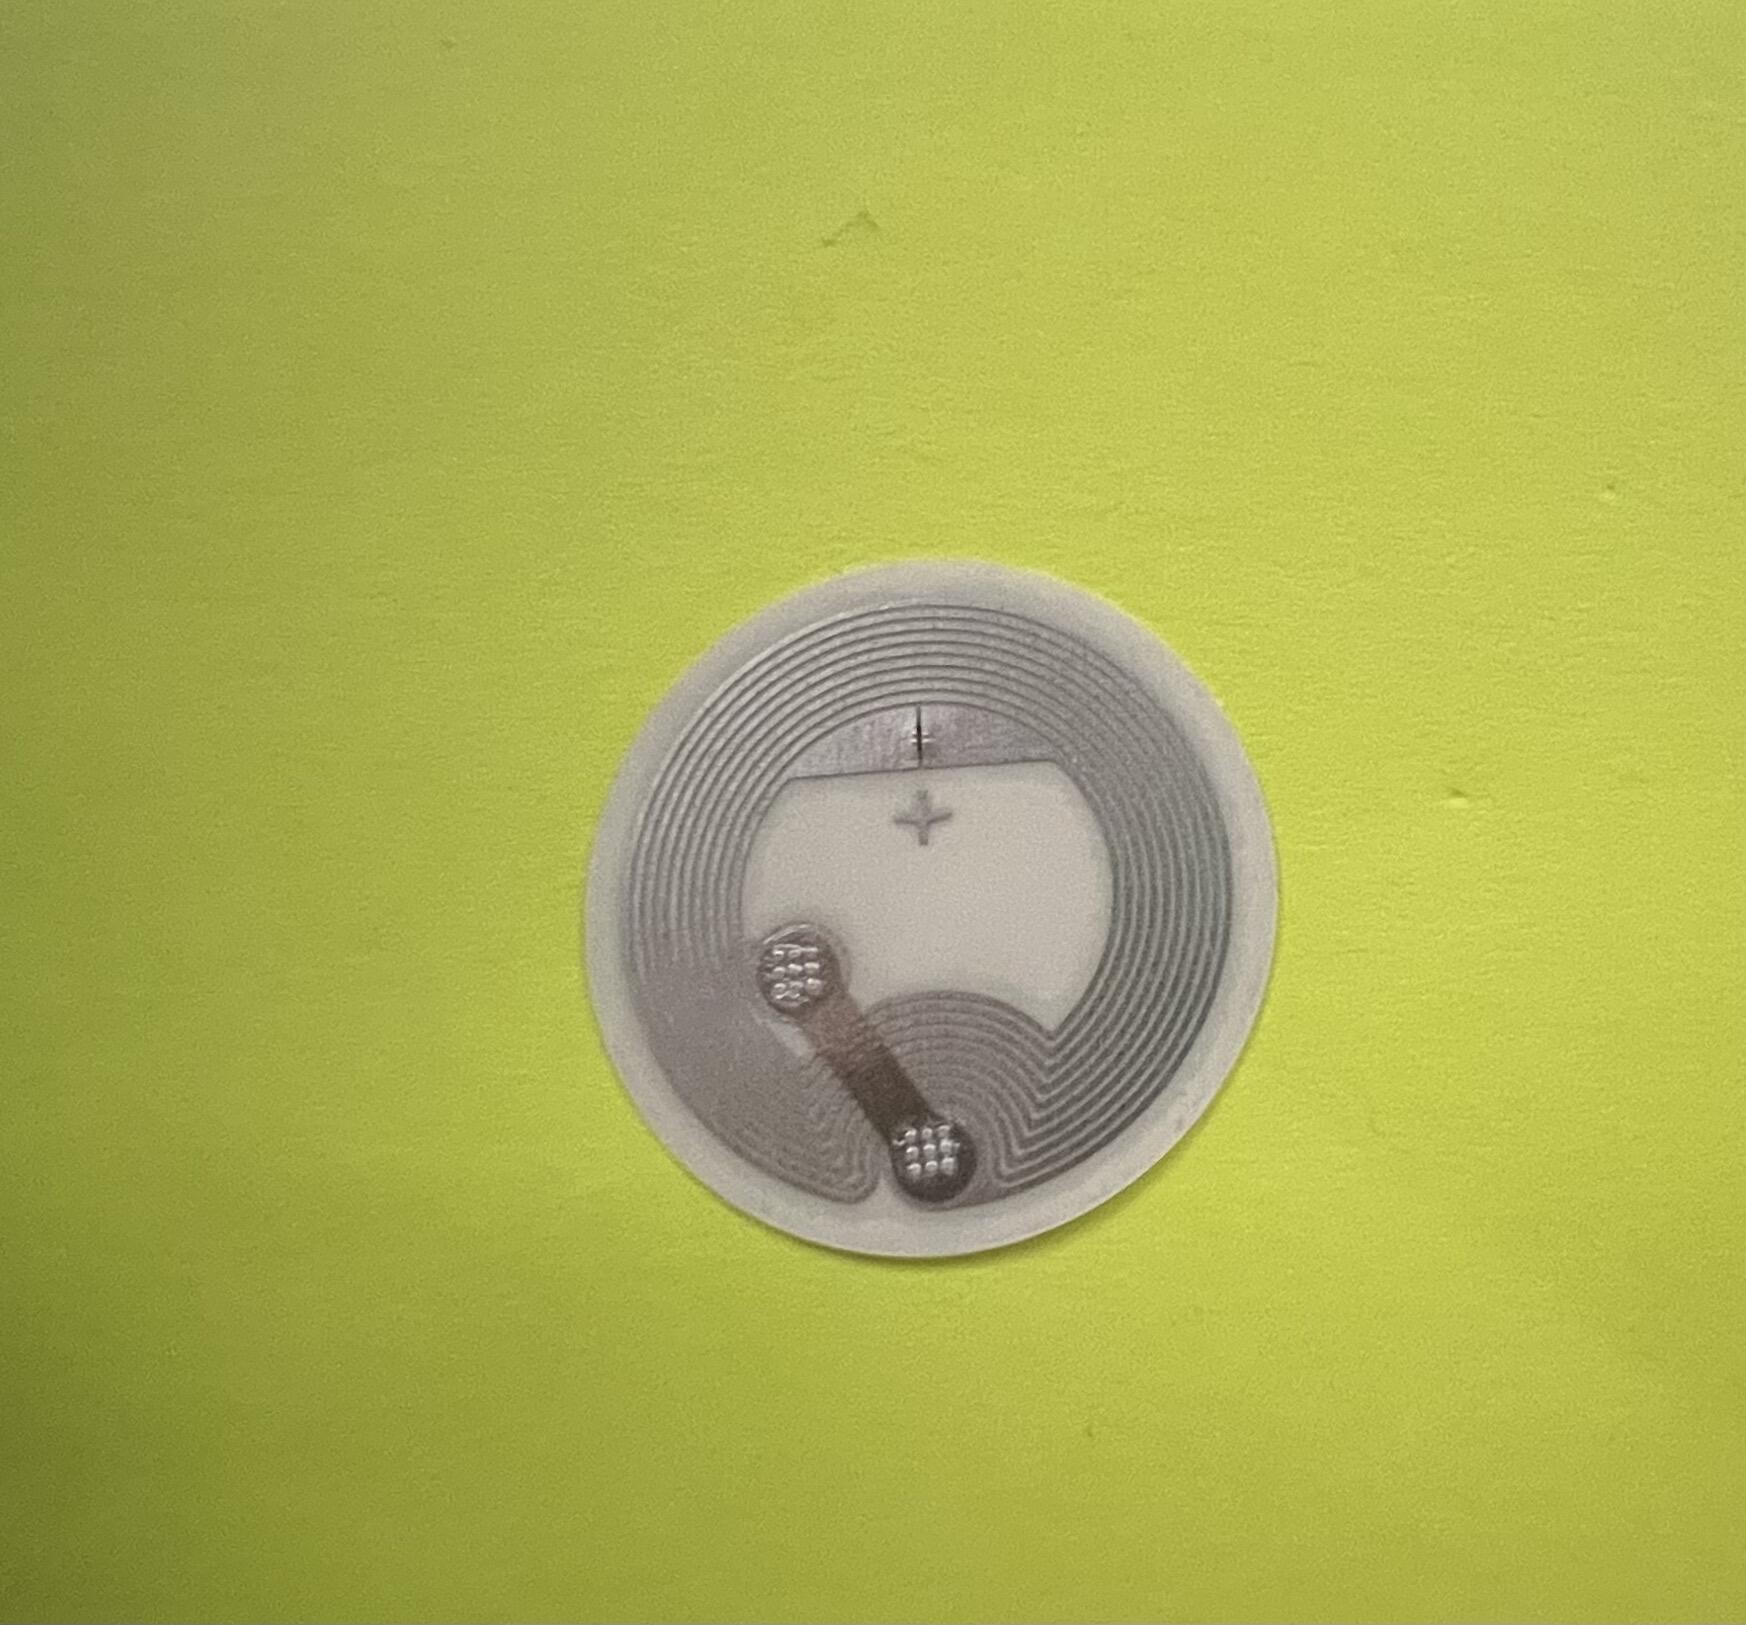
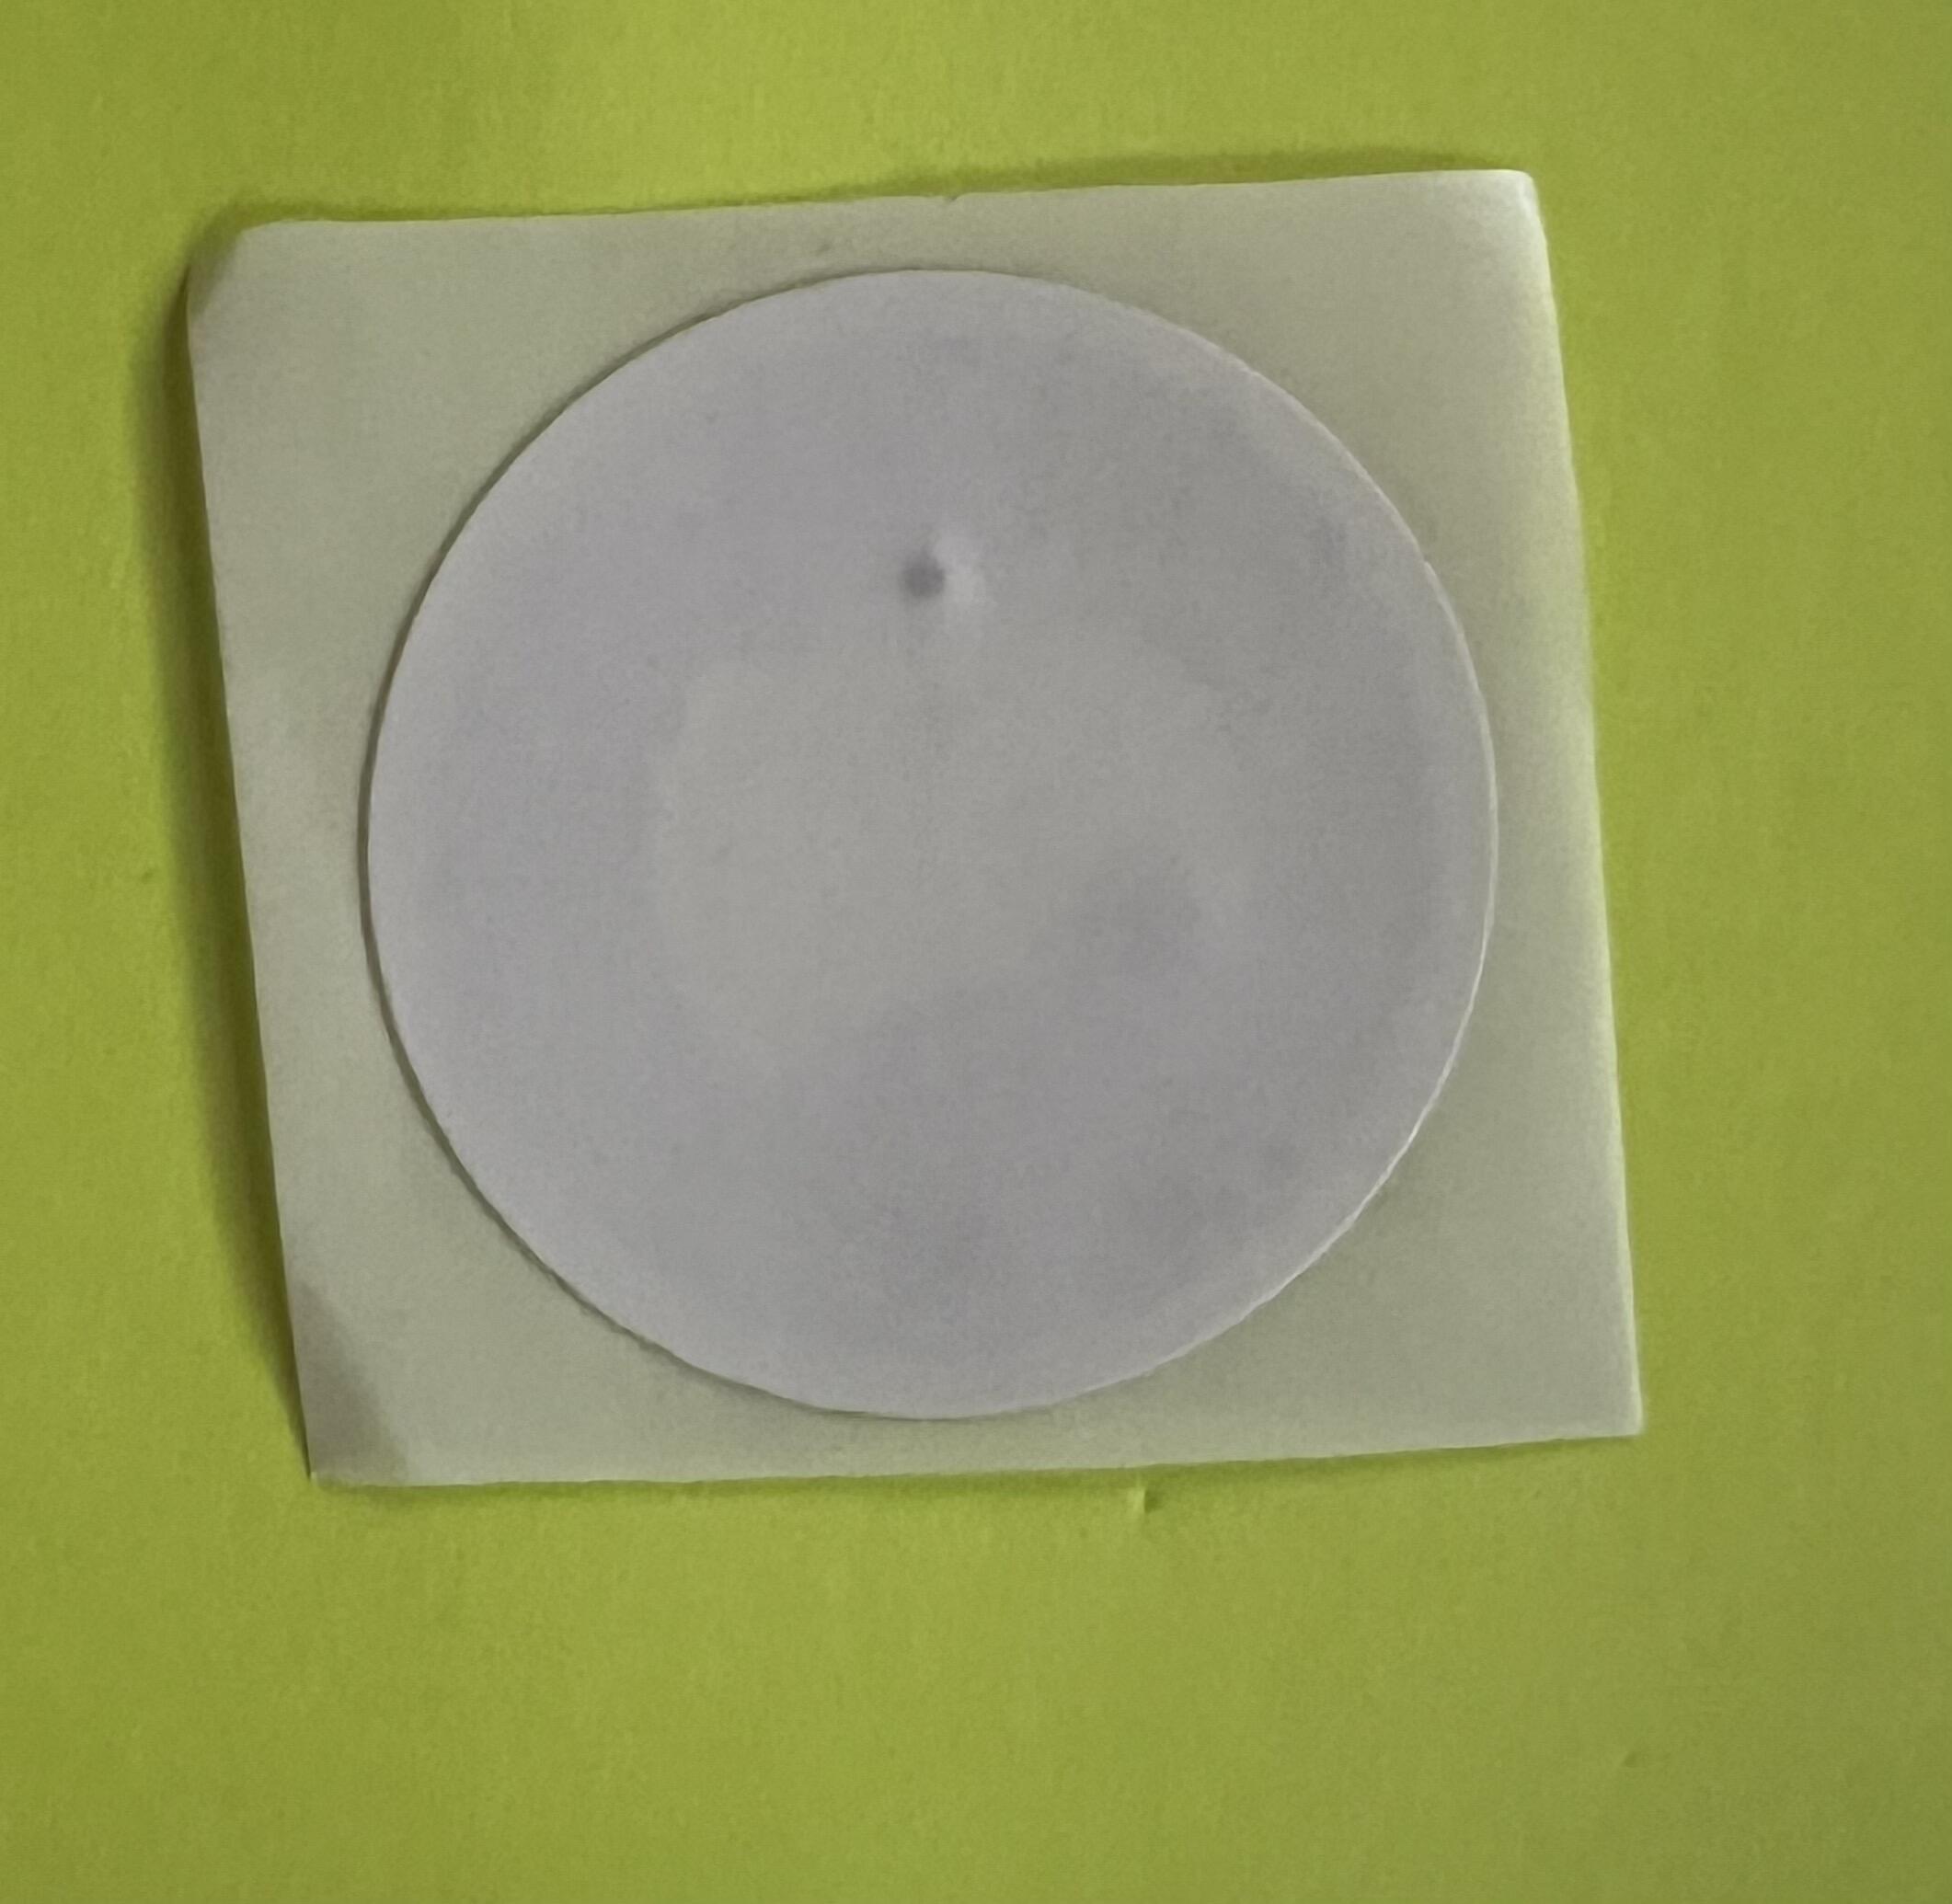
Have NFC sticker (I recommend 540 bytes), search on Amazon, Alibaba or Temu. https://image.nostr.build/66ccef195de4c8e9b915d6ee62d1e3f8856a5438160200a00d4069c7caeda4da.jpg https://image.nostr.build/1cfb47ea052e60f60add90d43cd1b70d28208188167a6cf90843cf594e088152.jpg
Have a Bitcoin wallet and know how to get the zpub.
Download the bluewallet app on your device, it is the app that we will use to open and obtain the information read from the NFC sticker.
Android
IOS
Have NFC sticker (I recommend 540 bytes), search on Amazon, Alibaba or Temu. https://image.nostr.build/66ccef195de4c8e9b915d6ee62d1e3f8856a5438160200a00d4069c7caeda4da.jpg https://image.nostr.build/1cfb47ea052e60f60add90d43cd1b70d28208188167a6cf90843cf594e088152.jpg
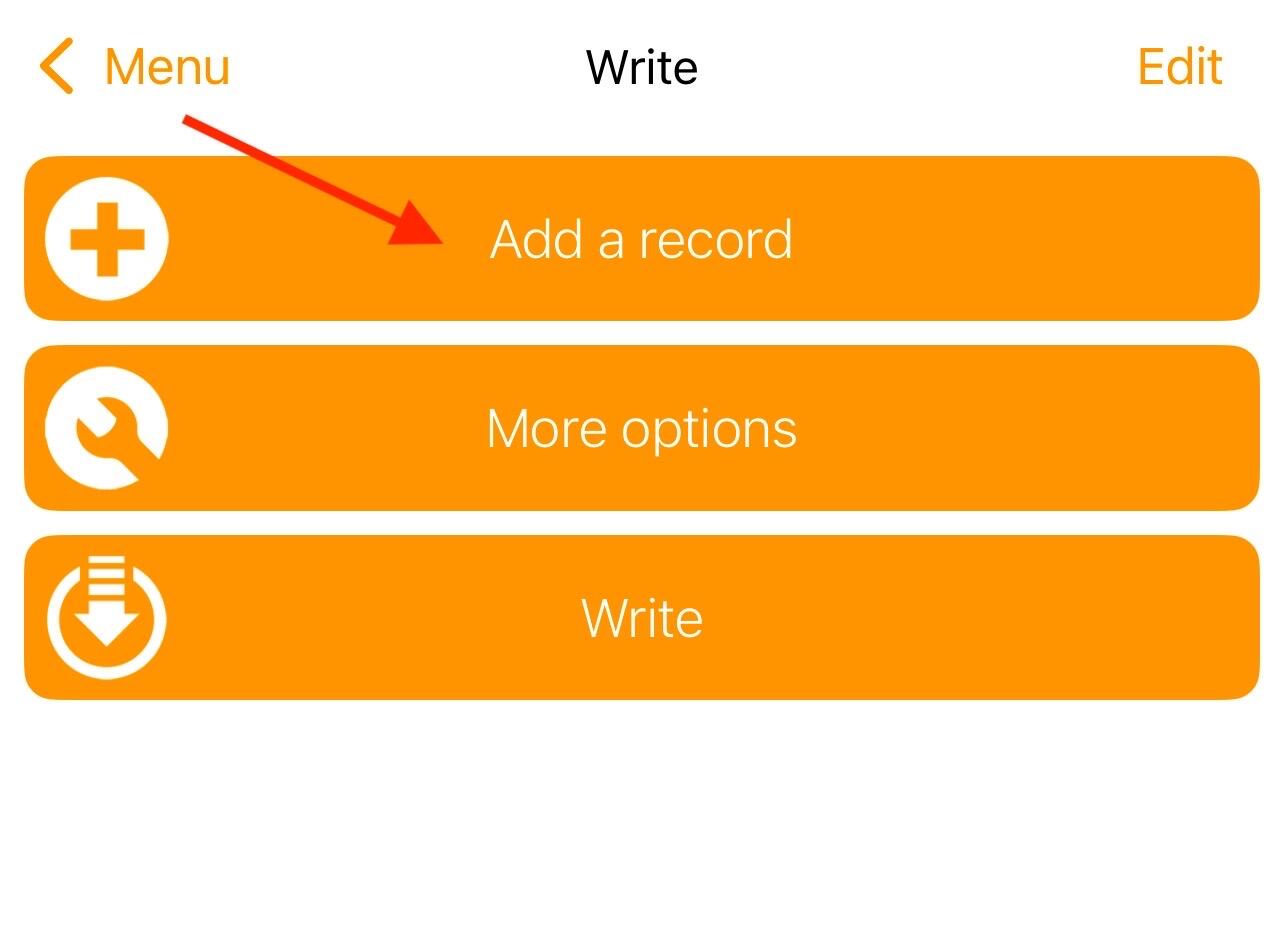
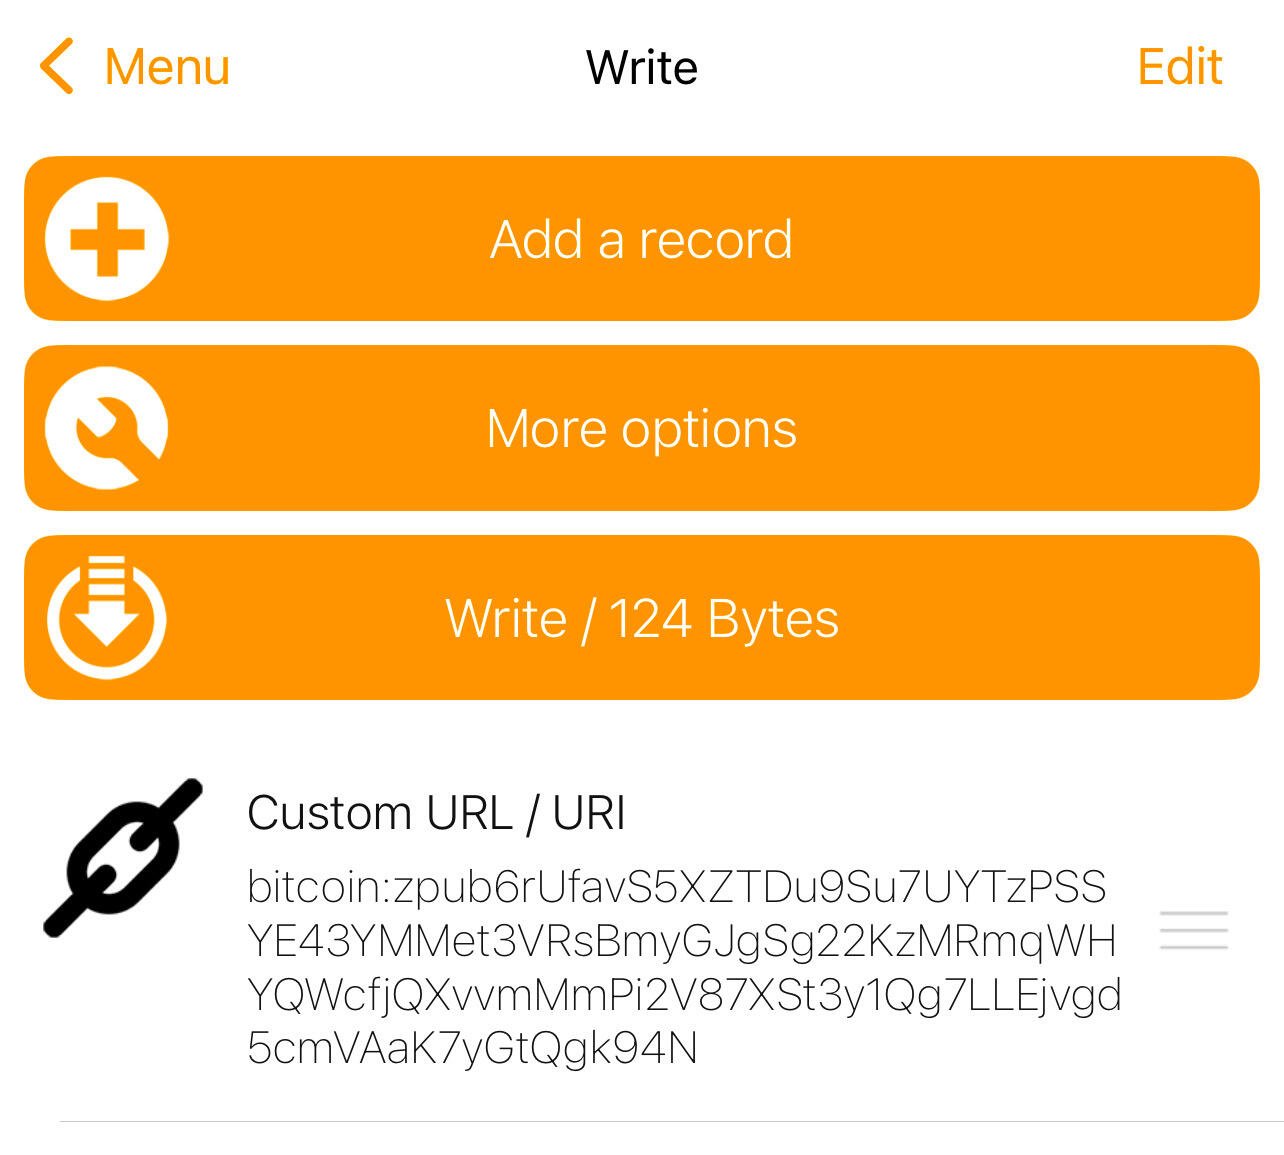
Steps: Copy the Zpub from the Bitcoin wallet you want. Ve a NFC tools>Write>add a record> Custom URL/URI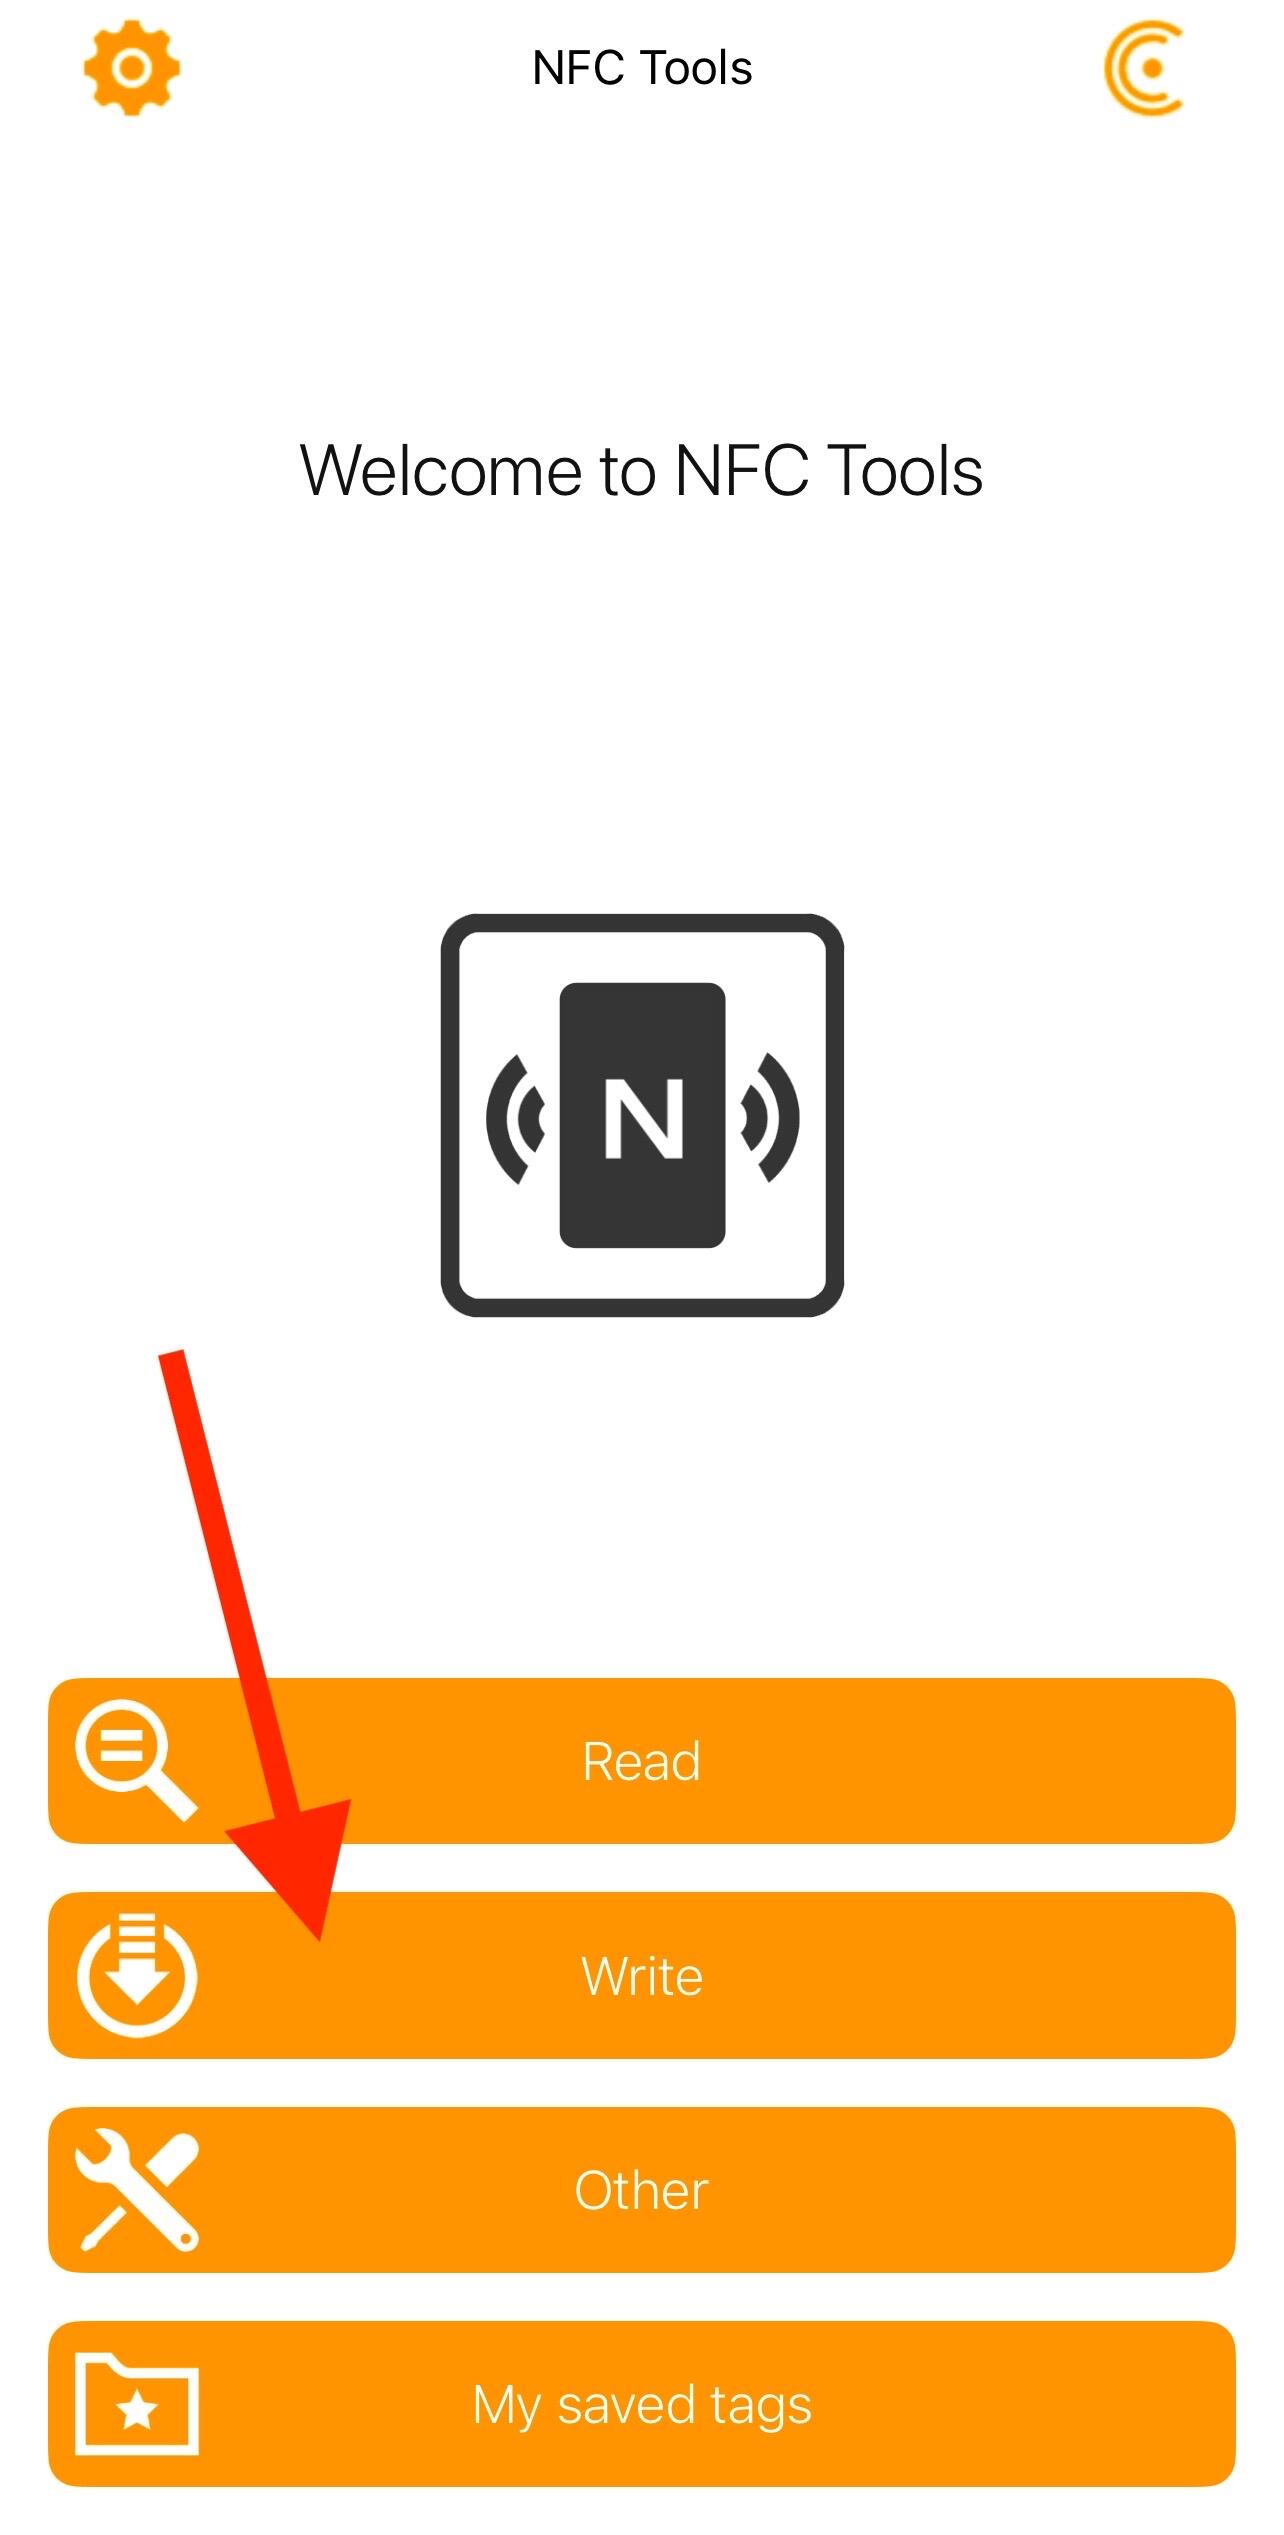
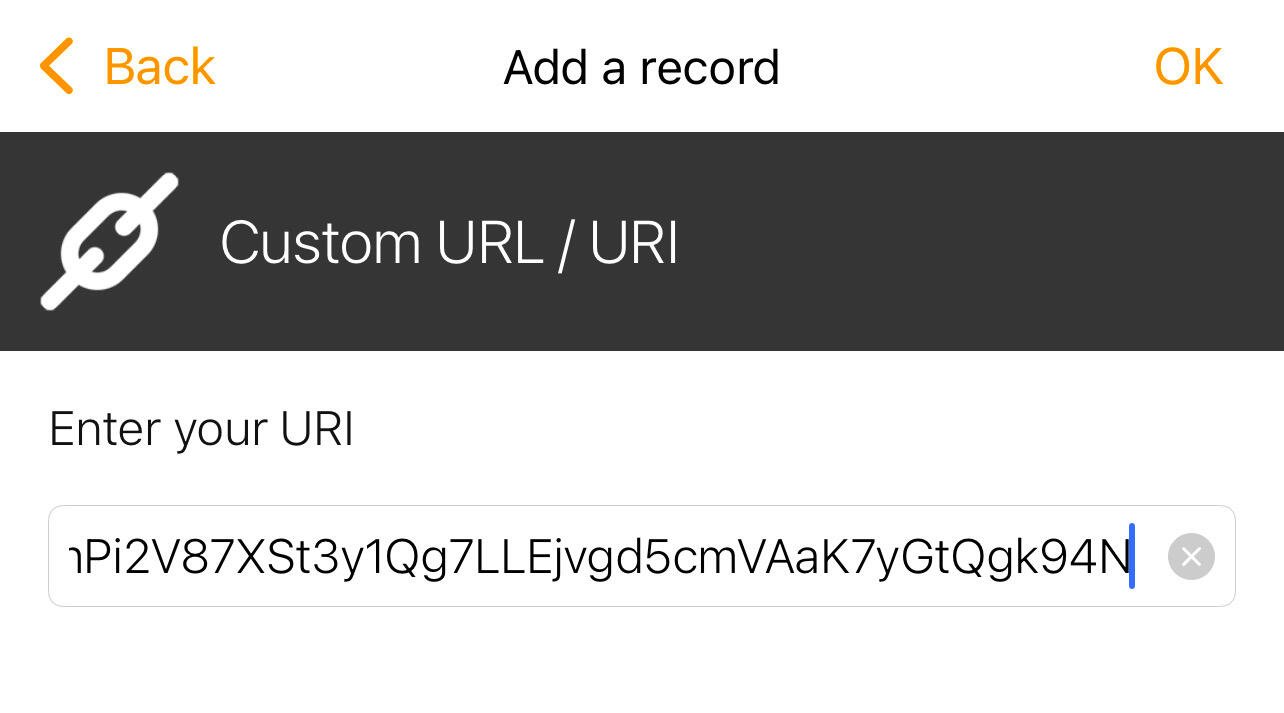
In custom URL/URI enter and copy the zpub, bitcoin:<your Zpub> https://image.nostr.build/15950a2e3ba5ee9009866d30c6b94eee4204dcc1e96c234185cebf65d6181420.jpg https://image.nostr.build/ef5a6de0b5e4f184f1e9b0f641c6ace7eaff39094c2ef7fc42b6fb4dc1bf9487.jpg
- Bring the NFC sticker closer and save the information
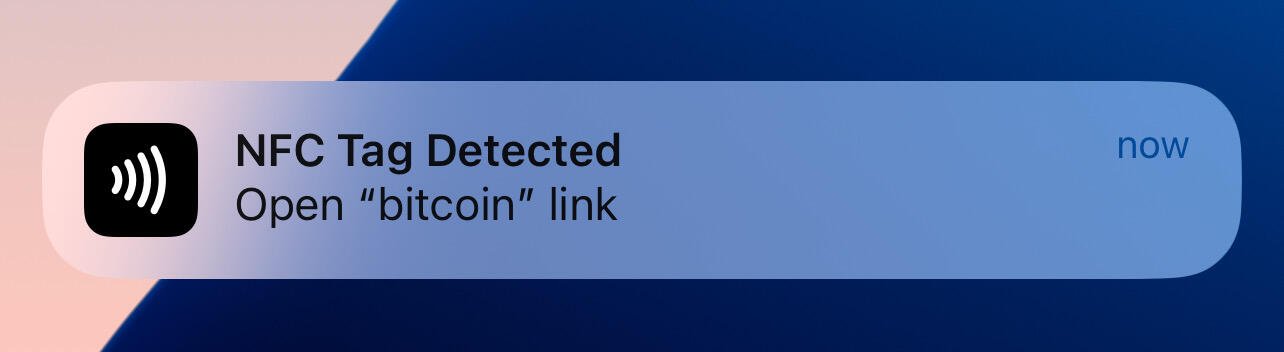
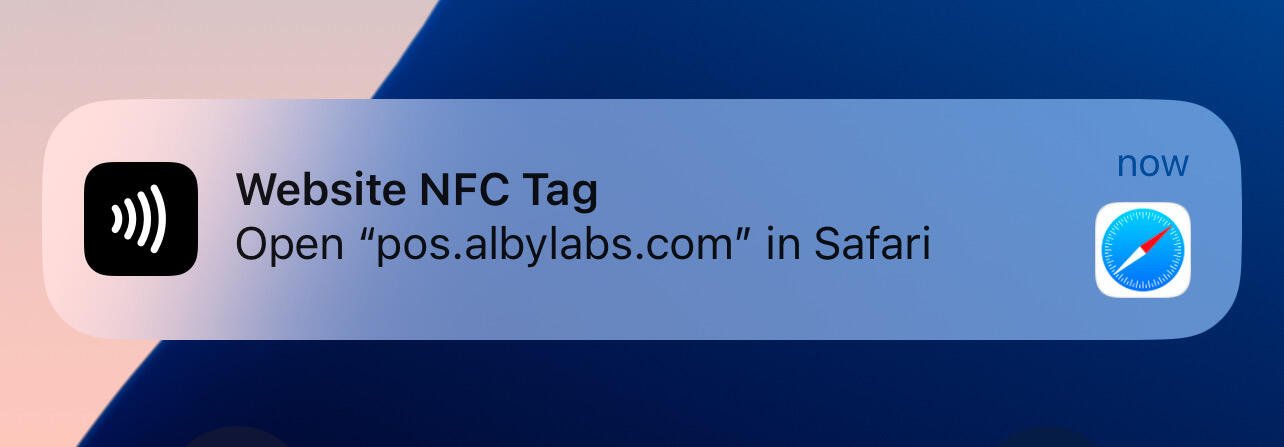
- Check the saved information by bringing the NFC sticker closer, a notification should appear (see image) that redirects you to bluewallet and automatically adds the wallet in Watch-only mode.
These tools combine innovation and security, positioning themselves as practical solutions to improve interaction and asset management in the Bitcoin ecosystem.
**Not your keys, Not your coins**.
Articfox@getalby.com
**Not your keys, Not your coins**.
Articfox@getalby.com

Walkthrough NFC Sticker and Buzzpay PoS
Posted over 1 year ago
In the case of Buzzpay, this platform facilitates the integration of payments in Bitcoin through the Lightning network, allowing users and merchants to accept payments more efficiently, with lower fees and much faster confirmation times compared to traditional transactions on the Bitcoin network. Additionally, Buzzpay focuses on improving the user experience and sats go directly to your node.
Prerequisites: Own a bitcoin node with open channels and liquidity. Start9 Umbrel Add Albyhub to the node. Within Albyhub>Buzzpay PoS> add a PoS name > a QR code and an https will appear with a link that you must save. https://image.nostr.build/a6dfe503d48a74589c60572ded541fd15fac0aca948777fd15f1e496427725ee.jpg
Have NFC sticker (I recommend 540 bytes), search on Amazon, Alibaba or Temu. https://image.nostr.build/66ccef195de4c8e9b915d6ee62d1e3f8856a5438160200a00d4069c7caeda4da.jpg https://image.nostr.build/1cfb47ea052e60f60add90d43cd1b70d28208188167a6cf90843cf594e088152.jpg Download the NFC tool application. Android IOS
Steps: Obtain the Buzzpay https link (see prerequisites). Ve a NFC tools>Write>add a record> Custom URL/URI https://image.nostr.build/4839d43916ba59ac05a817edd344a3ab2997aa7e9d354fceae27e029a3874cf6.jpg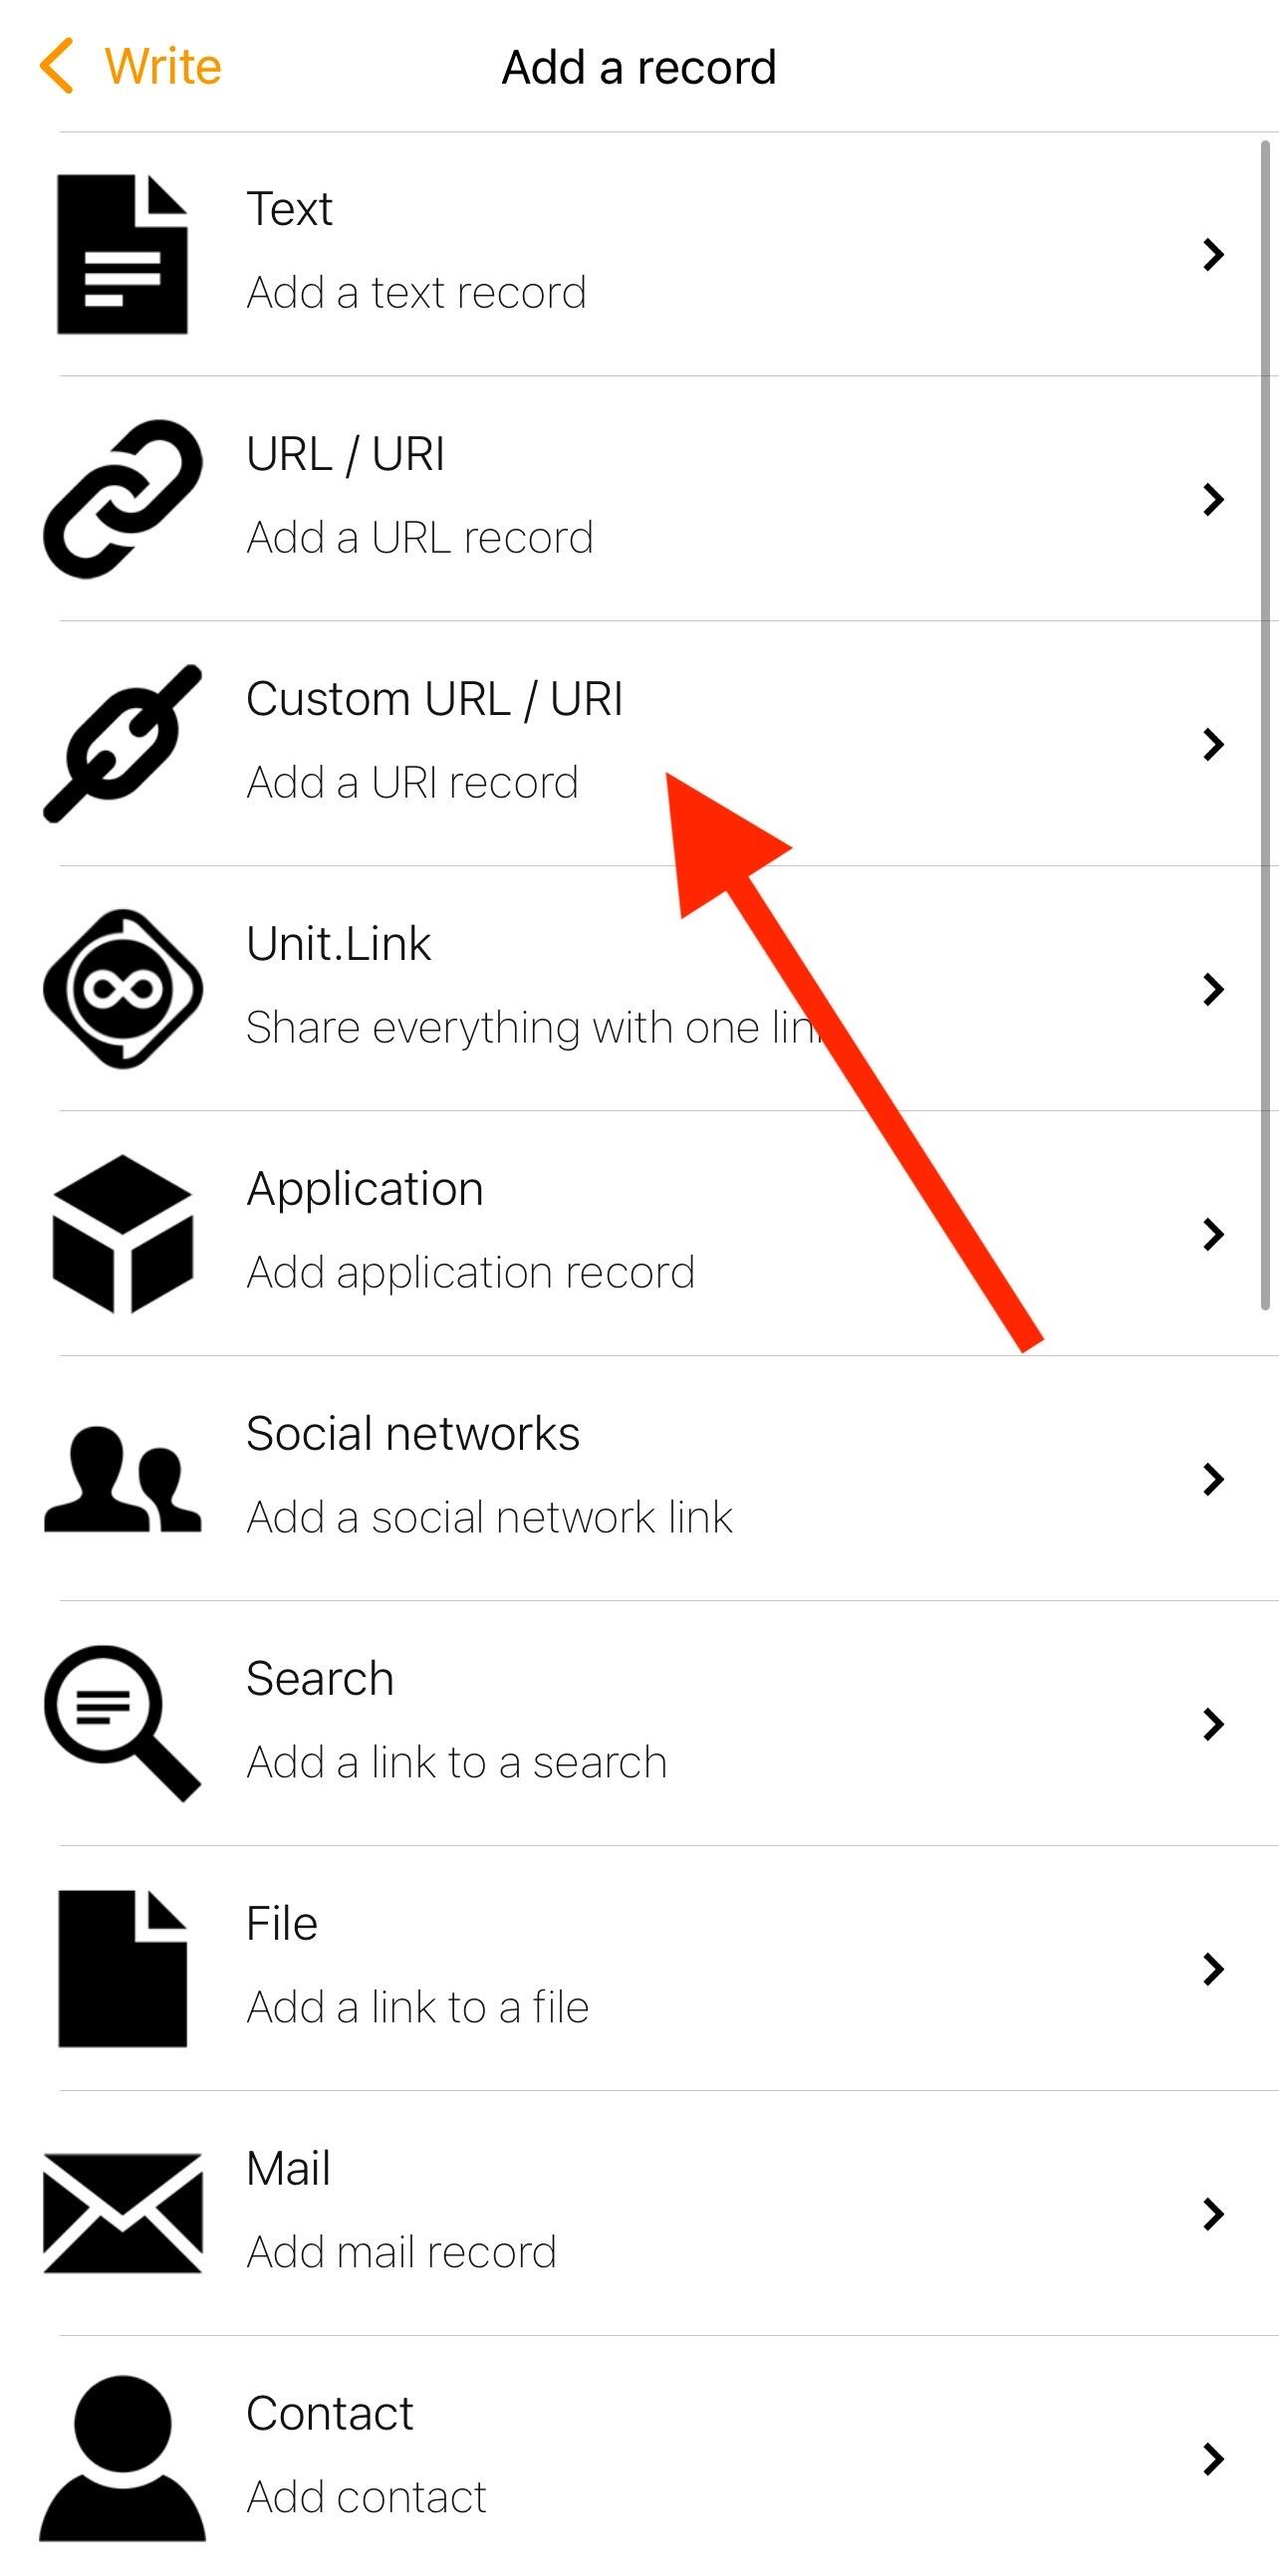
In custom URL/URI enter and copy the https address e.g. https://pos.albylabs.com/#?nwc=bm9zdHIrd2FsbGV0Y29ubmVjdDovLzIyZDM4NjQ2NmVkYTRiOTIwODVjN2I3ZDhiMTZhZjU4M2NhNmVlYjc2NTcwZGFmZjljOTFmZGZkMzI2MmE2Nzc/cmVsYXk9d3NzOi8vcmVsYXkuZ2V0YWxieS5jb20vdjEmc2VjcmV0PWVjYzdjMTEyZGI0ZjI5MWJkOTIwMjQzY2RmODEzNDQyNzA3ZTMzOTBiNTQ5NjllNTM5MjlhMDhkY2RjZGYzYzk=&name=PoS_NFC_tutorial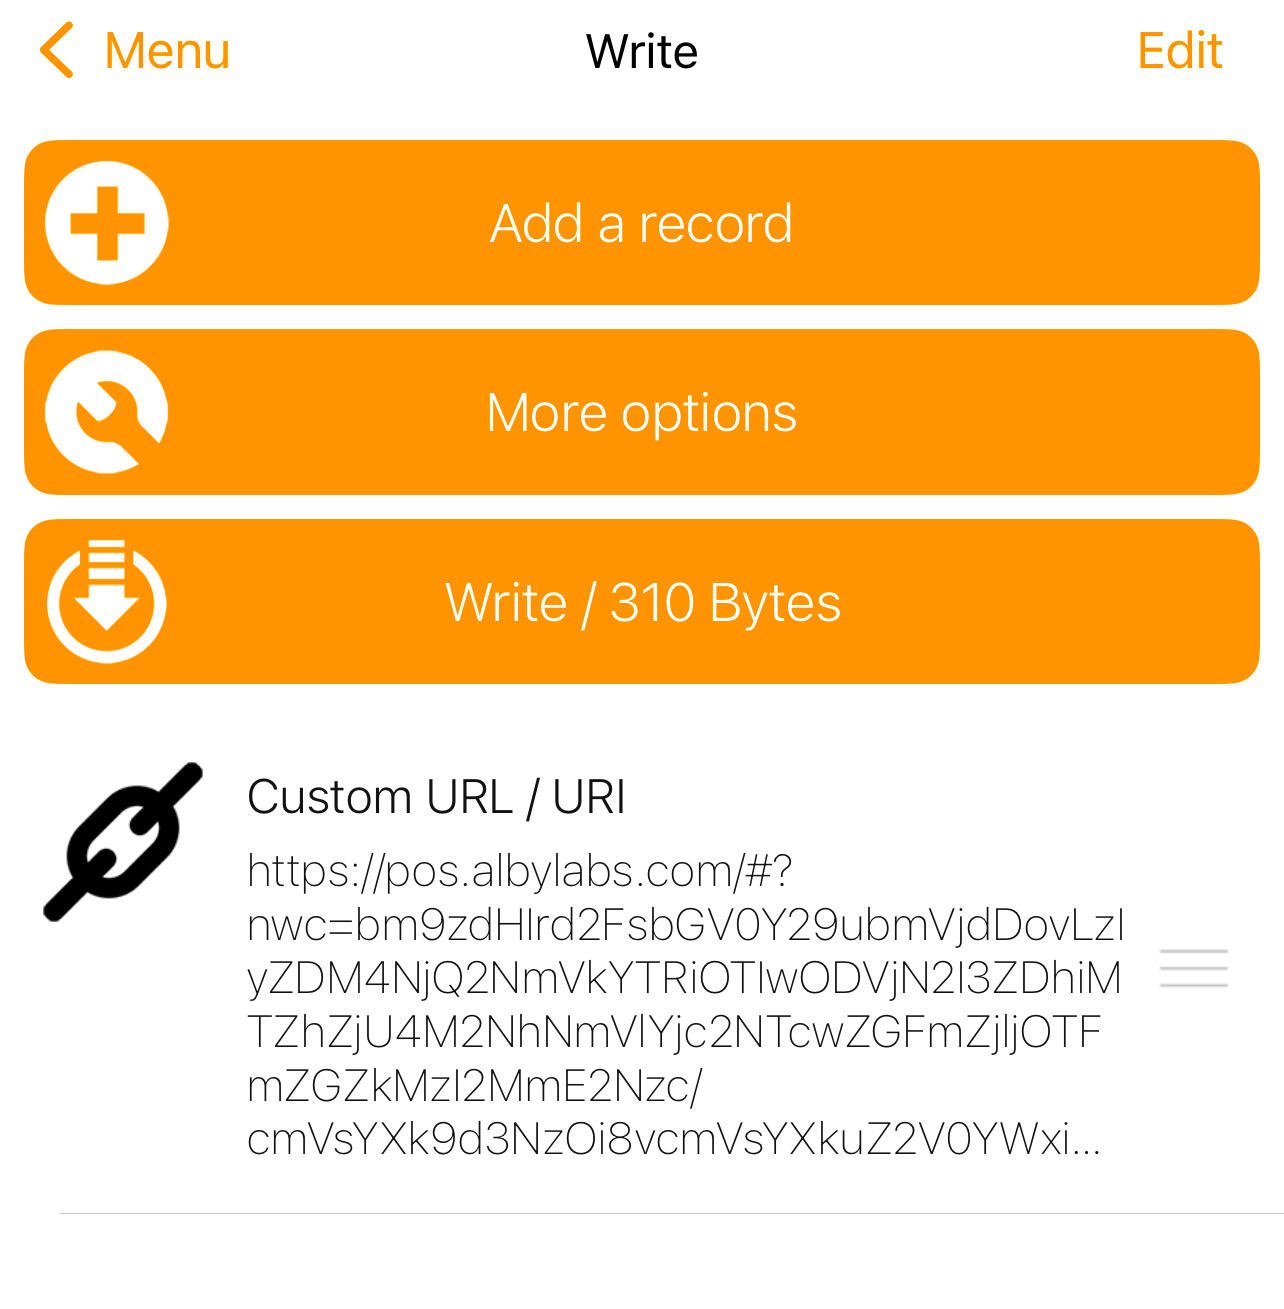
- Bring the NFC sticker closer and save the information
- Check the saved information by bringing the NFC sticker closer, a notification should appear (see image) that redirects you to the browser and you can now use your personal PoS whose sats go directly to your node.
Now if you want to receive a payment, you just have to bring your cell phone close to your NFC sticker.
These tools combine innovation and security, positioning themselves as practical solutions to improve interaction and asset management in the Bitcoin ecosystem.
**Not your keys, Not your coins**.
Articfox@getalby.com
Articfox@getalby.com
